The Feathery Bookmobile

This idea didn't originate with me, but it surely resonated with me! When I first saw these beautiful, drapey book-mobiles in a storefront window display,  I immediately saw the resemblance to quilted feathers and knew that I'd love to re-create the look in my quilt shop window. When one of my employees challenged the whole staff to create their own special store display, I knew exactly what mine would be!

A Book Mobile

The first task would be to find the books...books that I wouldn't feel guilty to 'artistically rearrange'. My husband has a fairly big wall in his antique shop filled with old books. I thumbed through them one by one, choosing books that had outlived their usefulness in the literary world. I found three. Game on!

The mobile was very easy to make, and in just a few minutes I had flowing plumes that resembled the quilted feathers I so love! I found a great tutorial by The Pleated Poppy here. I think they would look great in a library or in a child's room, too! My daughter, Bonnie, and I took the idea to Spring Quilt Market, using her upcoming Succulence fabrics in place of the paper pages from the book!

Succulance Fabrics by Bonnie Christine for Art Gallery at Quilt Market.

Sort of brings a new meaning to the bookmobile, right?

Thanks for visiting! Happy Sewing and God bless, Maxie


How to Create Gentle Gathers

I am a quilter, but garment sewing is my first love in the sewing world. You probably know that I have a little grandson, Bear, who is expecting a baby sister in about 4 weeks! I love sewing for Bear. In fact, I made a pillow case for him today, from a print filled with elephants and monkeys. He loves it. But sewing for a girl is different, and I'm very used to that because I had two daughters! So gather 'round, everyone! Today we are gathering!

How to sew a sleeve into a garment.
Setting a sleeve into an arm opening.

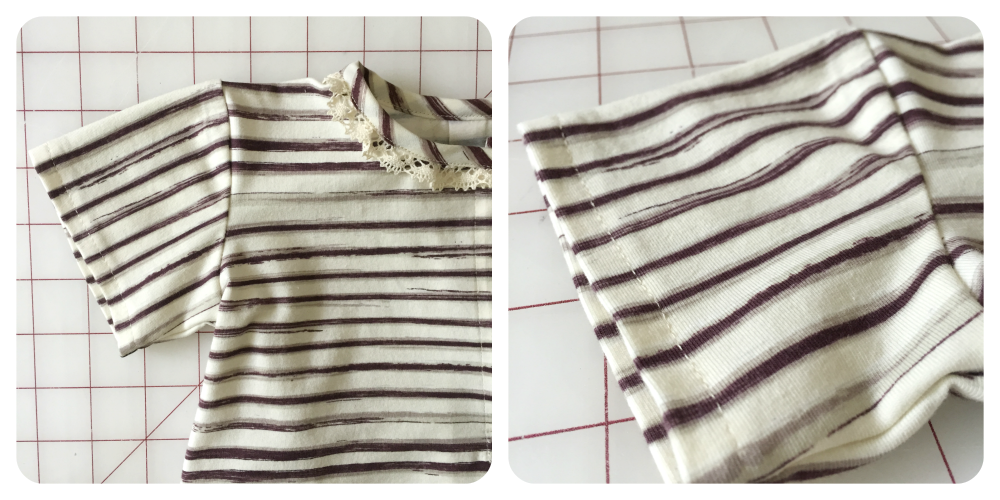
So, here's what that sleeve and armhole opening look like before they are sewn together. You can see that the sleeve's curved edge is larger than the arm opening edge (above left). What to do about that? The sleeve cap (the upper curved edge) must be gathered to fit. This allows the sleeve cap to curve over the bend of the shoulder at the top of the arm. It's easy to do, and all this little sleeve will need are gentle gathers, not puffy, full gathers. I accomplish this easily by stitching along the curved edge and, at the same time, holding my index finger firmly behind the presser foot, pushing the fabric that feeds through into the back of the presser foot. This creates gentle gathers, as shown below in the video:

After gathering, place the sleeve cap edge, right sides together, against the arm opening. Match any dots or notches transferred from your pattern and pin in place, (as shown in the photo, above right). If you still need to gather a bit more, pull gently on the bobbin thread and distribute the fullness. Stitch in place. Easy as pie!

Thanks for visiting! Happy sewing and God bless! Maxie

Soap and Sewing

What do soap and sewing have in common? Actually, the two go hand in hand! Let me get on that soapbox for a minute to shout the accolades of a wonderful little cleansing bar! Never before have I thought I could be so in love with soap until one of my quilt guild buddies mentioned it at a meeting recently. After her ovation I just knew I had to give it a try. This little bar is hand made by one of our guild members, Jeannie McDougall, right here in my home town. I asked Jeannie about her soap and she graciously gave me a bar to try. In less than 60 seconds I was a believer! My hands, like all sewists, quilters and fabric handlers, are chronically dry because fabric just draws all the moisture right out! I get so tired of having dry skin, and using hand cream isn't a great solution for me because I don't want to get the cream on the fabric.  This little, unscented bar of soap fixed my dry skin. Period! You can get your hands on some here!

Jeannie's Soap
Jeannie McDougals Soap
Jeannie's home made soap.

With the simplest of ingredients, Jeannie has developed this soap to leave your skin feeling soft and smooth. It lathers like crazy, and I find myself washing instead of applying lotion! But don't just use it for your hands...when Jeannie told me that she shampoos her hair with it, I was skeptical at first, because I've been attached to my shampoo & conditioner for a long time. I finally did give it a try as shampoo. Double believer. No cream rinse necessary. Want to give it a try? Click here!

Wooden soap dish not included.

Wooden soap dish not included.

A round of hand-clapping for this hand-softening marvel!

Thanks for visiting! Happy sewing with soft hands and God bless! Maxie


Reflecting on the Mirror Image

How often do you put to use some of those great features on your sewing machine? If you stick with me on a regular basis, I hope to help you begin to use a lot of your machine's special abilities that you might otherwise overlook. One great feature on most machines today is the mirror image. It's obviously needed for certain applications, such as when using the blanket stitch for applique´ and you just need the stitch's jump to work in the opposite direction for you. But what about a straight stitch? Could a mirror image be helpful for a straight stitch? Why, yes! I'll show you how I used it to make the sweet little bag shown in the photo below.

Bag is from Tilda's Summer Ideas, show above.

Bag is from Tilda's Summer Ideas, show above.

The mirror image feature does just what the name implies, flipping the stitch or design exactly opposite of the default setting. A scallop stitch that swoops to the right will swoop to the left when the mirror image is activated. That would be very helpful if you were stitching rows of decorative scallops down the front of a blouse and you wanted all the rows to the right of the center line to lay exactly opposite of the rows to the left of the center line. Janice Ferguson Sews has a great picture on her blog of decorative stitches that have been mirrored on the front of a garment. The need to mirror certain stitches is obvious, but let's look at mirroring a straight stitch. Here is the mirror image on the Baby Lock:

Baby Lock's Mirror Image Function

When I sew a ribbon on a piece of fabric, I like to stitch both sides in the same direction so that the fabric is not skewed. When stitching straight lines some people stitch one line in one direction and the second in the opposite direction, continually alternating sewing directions to 'even out' the layers. I can usually spot when this is done, because the fabric will slightly skew between the rows of stitching.

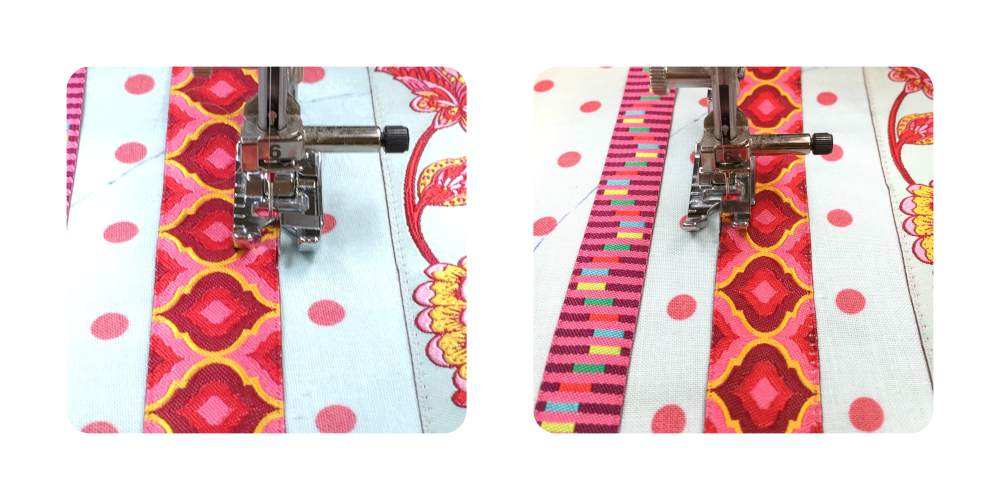
For this project, I used the Edge Joining Foot to stitch along the edge of the ribbon. I set my needle in the position that I wanted, and sewed down one edge (left photo, below). Rather than turn my project and change stitching directions for the other side, I simply touch my mirror image button and slip my fabric over until the other edge of the ribbon is positioned underneath the needle (right photo).  Because this foot has a centered metal 'fence' guide, placing the ribbon's edge along the fence assures perfectly aligned stitches! Moving the project and realigning it under the presser foot as before will ensure that both stitching lines will be the same distance from the ribbon's edge, and that no skewing will occur.

Using the mirror image function with a straight stitch.

Yes, the mirror image works great with your straight stitch when you need to use both sides of the presser foot to guide your stitching lines, both sewn in the same direction! Try it for purse handles, too. Can you share how the mirror image function has helped you?

Thanks for visiting! Happy Sewing and God bless, Maxie


Put Your Best Foot Forward!

When we sew, sometimes using the right tool can mean the difference between homemade and handmade. I prefer handmade, but I'm no stranger to homemade! I've been sewing for a long time and I've paid my homemade dues, and that's one reason why I love to share things that make our sewing easier and, at the same time, offer a more professional finish. Today I want to share one of my very favorite and most useful presser feet, the Edge Joining Foot. This foot isn't likely in your accessory box because it is usually an option. Looking a bit like the blind hem foot, you might inadvertently think you have it, but upon inspection you'll notice the difference. Below is a shot of my foot as I sew in the ditch (seam) of this placket on a robe I made for my mother. With a small needle and a 60 wt. cotton thread, the stitching is virtually invisible. Show off!

Using the Edge Stitching Foot.

Pictured below are both the blind hem foot (left) and the Edge Joining Foot (right). Notice that the blind hem foot's center guide has a curve in it that wraps around the needle. The center guide on the Edge Joining Foot doesn't even extend into the needle area, allowing the needle to sew at any position you choose. Keeping your needle in the center position, as in the picture above, allows you to stitch perfectly in the ditch because the blade will guide your fabric. If you want to stitch on either side of the ditch, just move your needle into a right or left position. The blade will still remain in the ditch, but the needle will impeccably stitch the perfect distance from the ditch! Show off!

I use the Edge Joining Foot to sew many of my quilt bindings. The blade keeps your stitching line uniform on the binding's folded edge. You can see all four edges of this quilt's binding in the photo below (two sides show the front and two show the back). Show off!

Machine Sewn Quilt Binding with the Edge Sewing Foot

There is so much more that this little jewel of a foot can do for you, making you look like the best sewist ever!

  • Sewing edges of laces, trims or ribbons together.
  • Topstitching any edge (bindings, purse handles, etc.)
  • Sewing pockets into totes or clothing.
  • Sewing applique´edges in place.
  • Fagotting two folded edges together with a decorative stitch.
  • And more!

Do you have your Edge Joining Foot yet? Let's get out there and show off!

Thanks for visiting! Happy Sewing and God bless! Maxie