My Turn on Bonnie Christine's Succulence Blog Tour!

My day is here! I'm happy to, once again, participate in one of Bonnie's blog tours for her fabrics. This tour features her most current line for Art Gallery Fabrics, Succulence. You'll find all Bonnie's fabrics, including these, available with free shipping at my quilt shop, A Stitch in Time! And, did you know that I'm blessed to be Bonnie's mother?

Bonnie Christine's Succulence Blog Tour

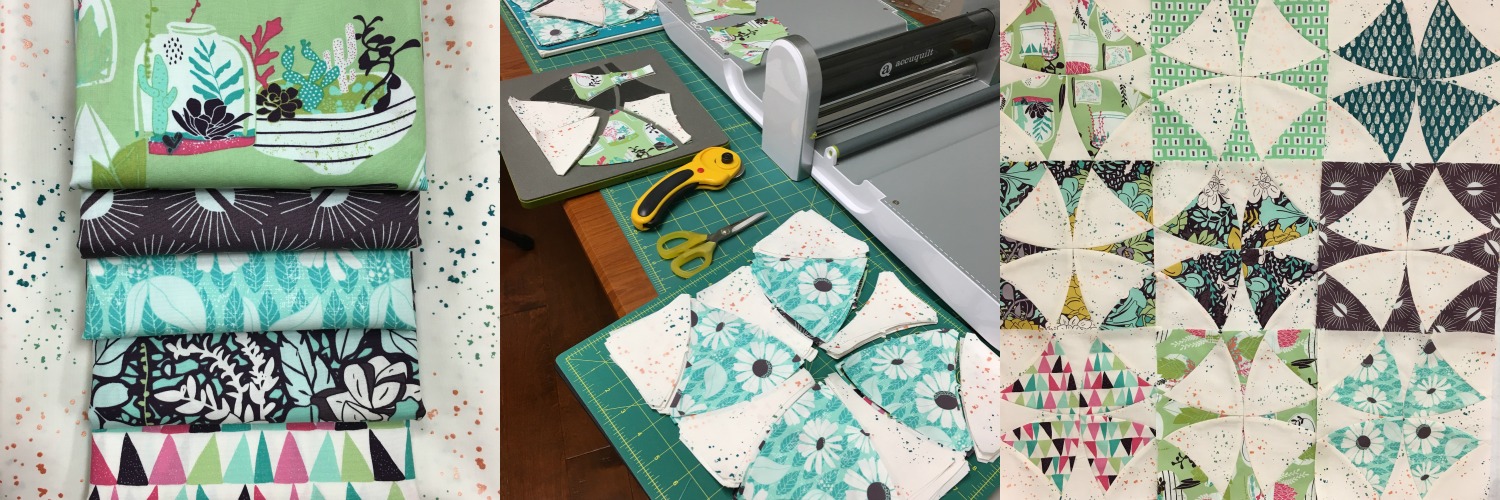
I love the colors and prints in this line so much that I decided to use it to check off one of the quilts on my bucket list! I have wanted to make a Winding Ways quilt for years, but I just couldn't make myself take the time to do all the precise curved cutting. Hmmm...I do have an AccuQuilt machine, and to my delight I found that they make the Winding Ways die! Oh heaven. AccuQuilt recommends cutting six layers in one pass, but I found that the fine pima cotton that Art Gallery produces allowed me to cut eight! (I can cut at least 9 binding strips in one pass, too, using the 2 1/2" strip die!)

Cutting the Winding Ways Quilt with the Accuquilt

For the AccuQuilt machine, I cut 10" strips, width of fabric, and found that folding them in half fit perfectly on the die. I layered two dark fabrics and two light fabrics, yielding 4 blocks in about 30 seconds! Some people ask me, "Do you waste fabric with the AccuQuilt?" My answer is, "Maybe a little...but I don't waste any time!" And each piece is cut perfectly, with notches for matching together.

This quilt block is 100% curved piecing. Wait! don't leave me! I promise it's easy and I made a short video to show you how easy it is. Click here to view it.

Winding Ways Quilt. Succulence Fabrics by Bonnie Christine forArt Gallery Fabrics

The magic happens in this quilt by making two versions of the same block: a dark center with light corners, and a light center with dark corners. The effect is quite entertaining, to me, because my eyes just won't stay still when I look at it!

Winding Ways for the Succulence Blog Tour
Bonnie Christine's Succulence Blog Tour

I quilted in the ditch to accent the design, and to keep a soft feel. I used one of Bonnie's voile fabrics for the back to make it extra soft!

For now, this one will live on the wall in my sewing room because it just makes me happy...and because it makes me think of Bonnie. Do you have a quilt on your bucket list?

Maxie Makes Sewing Studio

Be sure to visit yesterday's post by Ali Brorsen and see her beautifully sewn projects and her angelic model. Tomorrow's stop is Michelle Cain at From Bolt to Beauty.  See the full lineup, and read more about the blog hop on Bonnie Christine's blog, Going Home to Roost.

Thanks for visiting! Happy sewing and God bless. Maxie

DIY Ottoman Makeover!

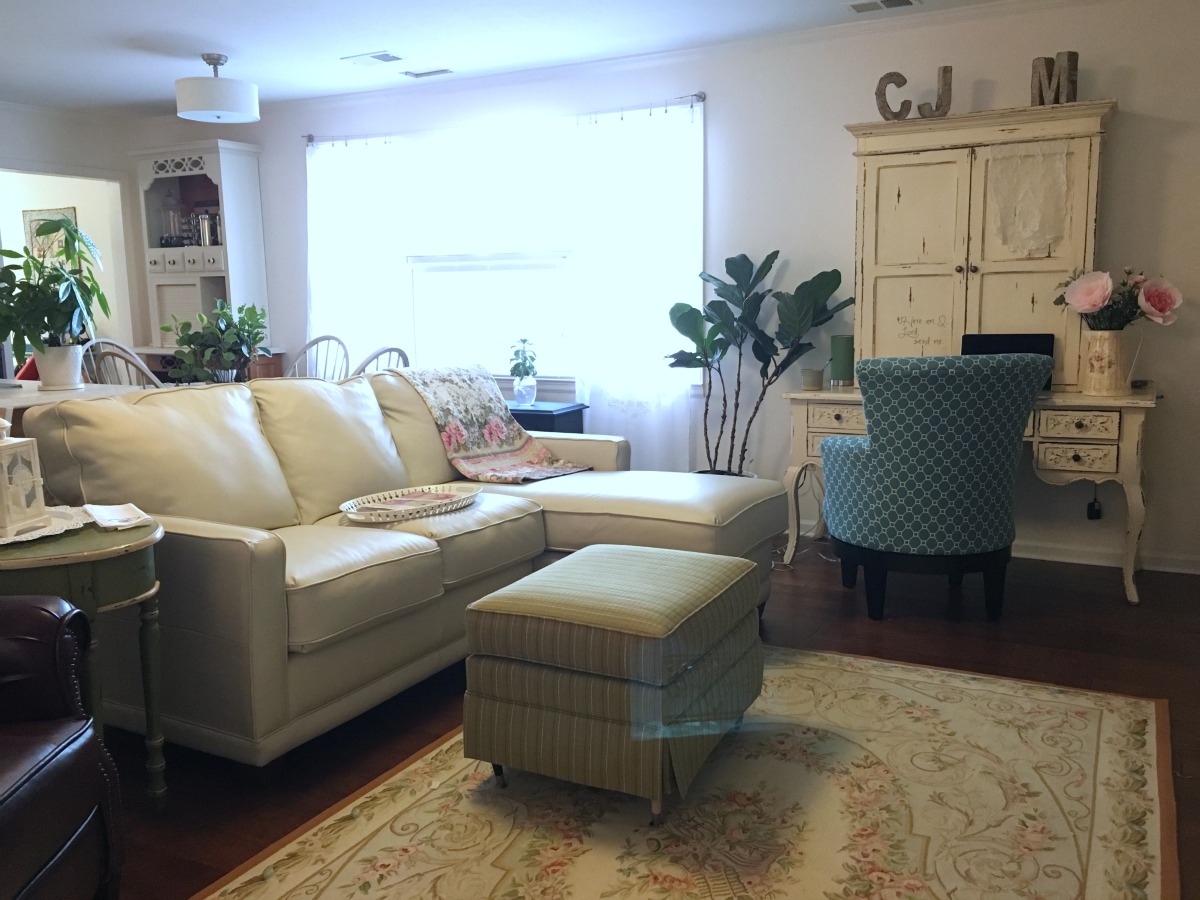
So...we moved into our new loft apartment this week! It's been a long 2 years in the renovation, but we are finally just about finished. My sewing space was the first thing to be finished, because I record the Maxie Makes videos there. You can read all about how my daughter, Bonnie and I made that space into my little corner of the world.

But, after it was all said and done, I hated my ottoman. Ugh. (That's short for ugly.) Agree?

Slipcovering an ugly ottoman.

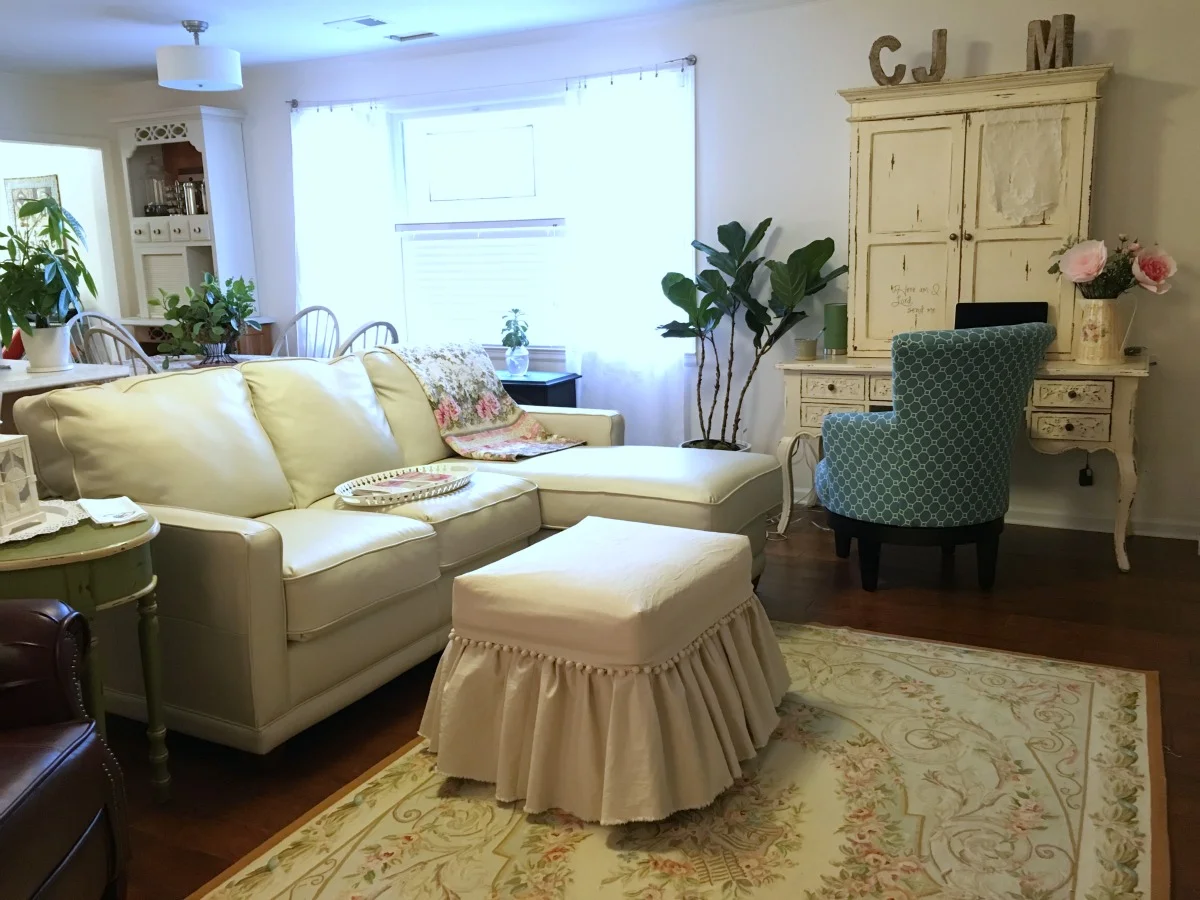
Transformation complete!

Slipcovering an ottoman.
Shabby Chic Slipcovered Ottoman

How? With a little bit of simple canvas, pom pom trim and elastic! I made a two piece slipcover. Here's how:

Supplies:

  1. About 3 yards 58" wide cotton canvas (prewash...it will shrink...and most likely, it will wrinkle so much that it can't be ironed out, which I adored)
  2. Enough pom pom trim for the perimeter of the ottoman.
  3. Enough 1/2" elastic for the perimeter, plus an additional yard for tying.
  • I measured the top length and width of my ottoman. I also measured the depth of the drop I wanted, which I decided to be 6 1/2" before hemming. I cut a rectangle the measurement of the top with 6 1/2" added on all four sides.
  • I measured for the skirt, planning to let the bottom edge ravel and not hem it. If, however, you want to hem your skirt, be sure to include that in your measurement. My ottoman has two sections attached to each other at the middle area. This middle allowed me to sandwich the top of the ruffle between the top and bottom section, nestling it in the crease. I measured the bottom section and added about 1" to tuck inside the crease between the two sections. If you work with an ottoman that doesn't have this option, you could use velcro attached to the ottoman and the top of the ruffle.) I tore 4 canvas pieces, width of fabric. Because I gathered the skirt with elastic, I didn't fuss too much with how much fabric to gather; I just knew I wanted lots of gathers, and four sections would give me a little more than twice the measurement of the perimeter.
  • Next, I boxed the corners of the top by cutting away a 6 1/2" square from each corner and stitching those cut edges together. Using a zipper foot, I attached the pom pom trim to the edge by stitching it to the right side, upside down, then flipping the seam allowance to the inside, allowing the pom pom trim to hang down. I also top-stitched the edge to give it a crisp look (first photo below).
  • Because the canvas is thick, I made a casing at the top edge to run the elastic through. For this casing, I cut 2" strips, sewing enough of them together to fit the top edge of the skirt fabric. I pressed the long strip in half, lengthwise, then attached it to the top of the skirt with a serger, (middle photo, above). Serger is optional, but heavenly! I pressed the seam allowance toward the skirt and top-stitched it in place (third photo, above).
  • Using a safety pin attached to the end of the elastic, I fed it through the casing. I allowed about 20" of elastic to extend out both ends of the casing for tying together.
  • Placing the skirt around the mid section, I nestled the casing into the crease and pulled the elastic tight, evening the gathers on all four sides. I tied the ends of elastic together, into a bow so that I can easily remove the skirt for cleaning and trimmed away the excess elastic ends.
  • Last of all, I placed the top section on, snugging the pom pom trim over the mid section to hide the crease where the casing fit. Tip: I placed a double layer of cotton quilt batting on the top of the ottoman to smooth over the existing piping, and I stuffed the top corners with wool batting to completely fill in the corners.

Ugh-ly ottoman: history.

Slipcovered Ottoman

Thanks for visiting! Happy Sewing and God bless!


Succulence Blog Tour is Just Around the Corner!

It's almost here...the Succulence Blog Tour!

Succulence Blog Tour, by Bonnie Christine

16 bloggers share for 16 days their creations with Bonnie Christine's latest line, Succulence for Art Gallery Fabrics! It begins this Friday, January 29 and continues through February 19! All you need to do is check in on Bonnie's blog this Friday for the lineup. Each blogger will link to the previous blogger, as well as the next-in-line blogger, so it's easy to hop from one blog to the next. I love the anticipation each day of visiting the current blogger's website to see where their imagination has taken them. You'll be inspired by creatives from various parts of the world, seeing their interpretation of Bonnie's fabrics in their own projects. Aren't these colors yummy?

Succulence Fabrics by Bonnie Christine

I'll be up on Tuesday, February 16, so be sure to check back here on that day. But for now, here's a sneak peek at where my imagination is taking me:

Succulence Blog Tour Project by Maxie Makes
Succulence Fabrics Line by Bonnie Christine for Art Gallery Fabrics

Thanks for visiting! Happy sewing and God bless, Maxie

Sewing Curved Seams in a Quilt Block

Sewing curved seams in a quilt block is easy! Seriously. Maybe I've never been too afraid of them because I moved into quilting from garment sewing. When you think about it, sleeves, princess seams, necklines, etc. are all curved seams.

My daughter, Bonnie Christine, designs for Art Gallery Fabrics and is hosting a blog hop tour to spotlight her new line, Succulence. Of course, I was on the ready! The project I chose to make is a quilt that has been on my bucket list for a long time. I won't reveal that just yet, but I'll let you see one portion of the block that includes a curved seam. Actually, all the seams are curved, and I'm planning a video tutorial to show you all my tips and secrets for success!

Sewing Curved Seams in a Quilt

So, it looks easy enough in the left photo, right? But placing them right sides together makes it look a little daunting. Watch the video below to see how this seam is sewn, with no pinning! My Baby Lock sewing machine has so many helpful features for this technique. With the touch of a button my machine will automatically raise the presser foot each time I pause, making adjustments to the seam line easy!

Follow me on Instagram and Facebook for updates on this project, and watch for the Succulence Blog Tour over on Bonnie's blog, beginning January 27 and continuing daily through February 19!

Thanks for visiting! Happy sewing, and God bless! Maxie


These are a Few of My Favorite Things!

Another Christmas is behind us (not really, because my tree is still up), and I thought I'd share a few of my most favorite (received) gifts with you! No sewing in this post, just some fundamental fun!

My Favorite Things
  • First up, from my daughter, Becky. #1 is an under sink water filtration system and this marvelous instant hot water dispenser from Insinkerator! It delivers filtered water at boiling temps for coffee and tea and cooking, and cool water for drinking! The plumber is on call to install it and I can hardly wait to enjoy tea or french pressed coffee!
  • Photo #2, from Becky and Bonnie, is this lovely group of lovely-fying products! 1. Origins Anti-Aging Foundation gives great coverage with no harmful ingredients. 2. This Christmas happily discovered Beauty Counter! Becky gave me several products from this company, whose mission is to make quality skin care with responsible ingredients. Among my favorites is the Touch Up Concealer Pen, the best concealer I've ever used! 3. Origins Three Part Harmony oil-infused serum is non-greasy and silky smooth! 4. Beauty Counter's Anytime Eye Cream absorbs quickly and leaves skin velvety smooth. While on Beauty Counter's website, be sure to check out their luxurious lipsticks! 5. Sugar Advanced Lip Treatment is the most amazing lip care product you'll ever need! I already loved the regular version, which is clear and unscented, but this rose version adds a little color in the same therapeutic product.
  • #3: Bonnie gave me this beautiful vintage ceiling tile to use as an accent piece in our new home. It's so 'me'!
  • #4: Becky gave me a lovely basket as my "Christmas Stocking"! What a great idea! It was full of goodies, and I get to use the basket all year long!
  • #5: Another vintage piece from Bonnie, this leaded glass piece is about 36" long and 15" tall. I am having it built into a barn door for our pantry! I'll be sure to post a picture of it when it's finished!
  • #6: Comenzar's Flameless Flickering Candles. These battery operated candles look so real! They include a remote with an optional timer, so I can schedule them to come on at night and turn off at bed time! I'm enjoying them at this moment.
  • #7. Again, from Becky and Beauty Counter, Lustro Sugar Scrub and Enrich Body Butter. Enough said.
  • #8: Bonnie did her homework on this gift: The Rode Microphone to make more Maxie Makes videos! I preparing for one in the sewing room, and I'm very eager to try this baby out soon!
  • #9: Becky knew how much I'd love this: Phone Soap! A UV Sanitizing Light for my cell phone! I won't tell you that I'm a germophobe. But I put my car keys in it...and anything else that fits. If it fits, it's clean.
  • #10: Bonnie made this beautiful little woven wall hanging for me! I cherish it. She taught me how to weave on a Wood Creek Loom, so I know the work (love) that goes into it.

So, these are a few of my favorite things from my favorite people! I'd love to hear about your favorite things, so leave me a comment!

Thanks for visiting! Happy Sewing and God bless! Maxie