Presenting the "Hello, Bear Buck Forest" Quilt Kit!

Quilt kits make our lives easy and let us get straight to the fun of sewing! This project was a long time in the making, but today's the day that I can finally say that the "Hello, Bear Buck Forest" quilt kit is ready! The Buck Forest fabric line, designed by my daughter, Bonnie Christine, is now a basic with Art Gallery Fabrics, but it is originally a print from her "Hello, Bear" fabric line. Prompted by my good friend, Linda, I began to think about using Hello, Bear to make Buck Heads and border it all with a Buck Forest print.

Hello, Bear Buck Forest Quilt

The quilt, which is 76" x 84" includes sixteen (16) pre-fused, die cut buck heads, (ready to apply to the background fabrics!), background, sashing, outer border and binding fabrics!

I used Lite Steam-a-Seam2 as the fusible material for each head. This product is re-positionable and very easy to work with. Although touted as "no-sew" on the package, I recommend stitching around each head after fusing in place. To do this, simply drop your feed dogs and work free-motion style with each block individually, before constructing the entire quilt. I recommend a dark thread in the bobbin and top, and I'm loving this whimsical straight stitch, with about 3 rounds to hold everything securely.

Stitching the edges of Buck Forest Blocks

However, I have to share that I found an even easier way to stitch the Buck Heads in place...on my Handi Quilter long arm machine! I simply loaded the completed quilt top without the batting and backing, put dark thread in the bobbin and top, and stitched away!

Stitch Applique´on the Handi Quilter Long Arm!

I may never look at applique´ the same again! I've stitched applique´ on my long arm in the past, but always when loaded with backing and batting, which results in a lot of stitches on the back side of the quilt. Working with only the top loaded prevents any of the these stitches on the back, and allows me to use dark thread in both the bobbin and the top, regardless of my backing fabric color! (This quilt's backing, by the way, is Art Gallery's billowy cotton voile. Soft.)

For the quilting, I chose a free-motion woodgrain design in Superior Thread's clear Monopoly, allowing me to stitch over the Buck Heads without conflicting with the applique´stitches. Straight lines or simple meandering would also be great with that same thread.

So, go ahead, order my kit (here) and whip up a Buck Forest quilt for your own little woodland adventurer!

PS...Want a little back side view of making a quilt kit?

There were so many details to work out in creating this in kit form, and I began with contacting Custom Pro-Dies to make a die that would allow me to cut each buck head accurately and quickly. That required a letter of permission to the die company from Bonnie Christine before they would even agree to make the die. That's right. Bonnie gave me exclusive rights because I gave birth to her.

Even before the die was ordered the quilt and yardage had to be determined. I work in Electric Quilt, so I downloaded Bonnie's fabrics into the program so that I could use the actual fabrics I wanted for the quilt. As soon as the die arrived I began the sample. I fused Lite Steam-a-Seam 2 on the back side of every buck fabric prior to running it through the die-cut machine. The machine will handle about 3 layers, so that required about 5-6 passes to cut sixteen Buck Heads.

After all the Buck Heads were ready, I cut the background fabrics to size and fused the heads in place. I use a steam press in my studio, which makes all the fusing more efficient and it results in a good, strong bond. This is how the rest went:

  • Make the quilt top.
  • Write a rough draft of the pattern as I sew.
  • Stitch the applique´ on my HandiQuilter long arm machine.
  • Reload the quilt with batting and backing. Quilting time!
  • Bind the quilt.
  • Photograph the quilt for the pattern. (This involved a trip to the Biltmore House in Asheville, NC!)
  • Edit photos.
  • Figure fabrics for X number of quilts and place an order with Art Gallery Fabrics.
  • Order a boat load of Lite Steam a Seam2.
  • Cut Buck Head fabrics and Steam a Seam to size for each block, 16 per quilt kit.
  • Fuse Steam a Seam to each fabric, one by one.
  • Run fabrics through die-cut machine.
  • Cut fabrics for background blocks, sashing, outer border and binding.
  • Prepare final draft of pattern and order copies.
  • Assemble and package quilt kits.
  • Begin dreaming about the next quilt I'll make...

Happy Sewing! Thanks for visiting! God bless, Maxie

Lambkin Goes To Spring Quilt Market!

It's that time again...Spring Quilt Market with all the preparations and excitement for new fabric lines, notions and products! I always anticipate Bonnie's new fabric lines and have the unique opportunity to get my hands on them before they hit the stores! I'm excited to share two little quilts made from the line, with a video, (below) sharing a few of my favorite sewing features on my machine.

Little Lambkin loves it!

Bonnie's newest line, Lambkin, will be released by Art Gallery Fabrics in August, 2017, and it's justifiably as sweet as all her previous lines!

Lambkin Fabric by Bonnie Christine for Art Gallery Fabrics
Both Quilts.jpg

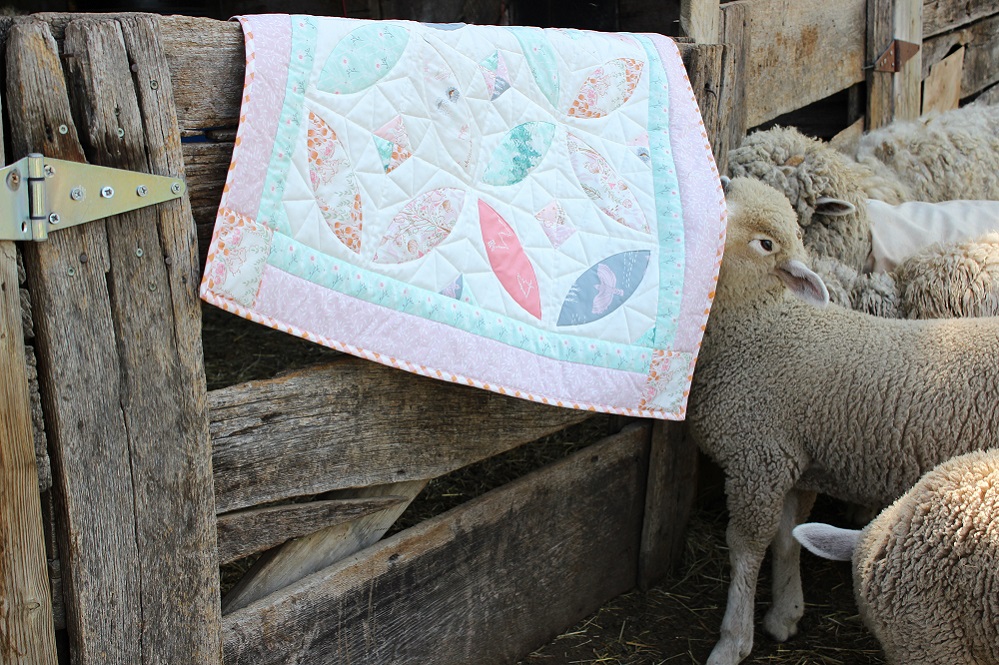
Both quilts are made using the new pattern, Orange Blossom, from Plum Easy Patterns by Bethany Miller. The petals are not fused in place, but sewn! Don't leave, please, I promise this is easy and that you'll love the technique Bethany uses! (I'll link to Bethany's video tutorial at the end of this post!)

Bethany uses freezer paper templates for perfect curved edges and seams. Her pattern is also layer-cake friendly for a scrappy look.

Orange Blossom Quilt by Plum Easy Designs

Let me share with you three of my favorite sewing features on Baby Lock's Destiny sewing machine (These features are available on several other Baby Lock models as well!)

Maxie shares three features on Baby Lock's Destiny sewing machine that make sewing easier, more accurate, and more fun!

Orange Blossom Blocks ready for assembly!
Orange Blossom by Plum Easy Patterns, made with Lambkin fabrics by Bonnie Christine for Art Gallery Fabrics

To view Bethany Miller's video tutorial for Orange Blossom Quilts click here! Thanks for visiting today! Happy sewing and God bless! Maxie

Forest Floor Blog Tour for Bonnie Christine

Forest Floor by Bonnie Christine

Today is my stop on the Forest Floor Blog Post featuring Bonnie Christine's current line, Forest Floor for Art Gallery Fabrics! This collection comes right from Bonnie's heart, because she and her sweet family live in a beautiful forest, quiet and serene. She lives in a part of the country that is noted for trails and waterfalls, so it's her little piece of heaven on earth. I traveled with Bonnie and Callie Lynch (her photographer) deep into the forest to photograph the Lookbook, so for a personal glimpse of her area, just click here!

Forest Floor Fabrics at International Quilt Market


I love that, as Bonnie's mom, I help her set up her booth at International Quilt Markets. At right is a look at part of her booth from Forest Floor. Like that Cross quilt? I shared about it in a previous blog post! You'll find the pattern here.

While at Quilt Market I found another beautiful addition for my quilt shop: Leather! That's right! The Old City Quilt Shop had a booth showcasing their leathers, with bags, wallets and even quilts made from them! (More on that soon!)

So... for today's project I chose to combine a beautiful saddle brown leather with Bonnie's Wild Posy Flora in a pattern from Swoon Patterns, Brooklyn Handbag and Traveler.

Brooklyn Bag by Swoon Patterns, made by Maxie Makes for Bonnie Christine's 'Forest Floor' for Art Gallery Fabrics.
Swoon Patterns' Brooklyn Handbag in Bonnie Christine's Forest Floor fabrics for Art Gallery Fabrics.
Leather trimmings for Swoon Pattern, Brooklyn

Have you ever sewn with a Swoon Pattern? The directions and pattern pieces are clear and easy to understand, and following their step-by-step instructions ensures a well-made, professional outcome. Here are all my leather pieces, ready to go! Look, just look, at that metallic gold zipper!

Working with this leather lead to a few customized changes in some of the pieces, particularly the strap connectors.  Swoon works with a lot of faux leather (vinyl) which permits the raw edges to be shown as trim, but my leather was much thinner and I wanted to finish off those edges. After a couple of trials for the strap connectors, I decided to cut them with a 3/8" seam allowance and turn that seam allowance to the wrong side. To do so, I stitched with a straight stitch along the seam allowance and then turned the allowance to the back side, bringing the stitches slightly to the back side as well so they would not show from the front side. The seam allowances were glued to the back side of each piece with an adhesive roller. I also found that a fabric glue stick worked great, and double sided tape is also a good choice for this process.

I did lengthen the handles a few inches just to fit my preferences. Other than these things, I followed the pattern just as it was written.

Clipping the leather in the curves was mandatory! Click on the photos for detail.

My leather is very thin, like gloves. It stitches beautifully, but there are a few rules you must follow for success:

  1. Use a leather needle! This needle has a blade like tip that cuts through the leather. A regular needle tears through and will tear between the stitches.
  2. Stabilize your leather! My favorite stabilizer is a cotton woven stabilizer called Shape Flex. I cut the stabilizer to exact size, with no seam allowances and fused to the wrong side of the leather. (Use a pressing sheet so that your iron does not touch the leather.) This allowed me to fold the seam allowance just over the cut edge of the stabilizer and glue it securely in place. The stabilizer acted as a guide for me while gluing. I stabilized every piece.
  3. After gluing, use a small brayer to flatten the seam allowance and press it nice and flat to the glue.
  4. Don't use pins! You'll make a hole in the leather, and once it's there, well, it's there. I glued everything. I tried to use the binding clips, but abandoned them when I found that they left an indention in the leather.
  5. Use a Teflon foot on your sewing machine! I've heard that you can alternately put tape on the bottom of your foot, and various other solutions, but...just get a Teflon foot because it was completely smooth and problem-free!
  6. Lengthen your stitch length. Stitches too close together could cause the leather to tear. Besides, it's just not necessary. Look at your shoes or a bag that is made from leather and examine the stitch length.
Brooklyn Handbag by Swoon Patterns in Bonnie Christine's 'Forest Floor' Fabrics for Art Gallery Fabrics

Lastly, make a little leather tassel for your zipper tab! I used two 1"x3" strips of leather, slicing 'fringe' in 1/4" increments, stopping 1" from the top. I sandwiched them inside a folded 1" x 6" strip that I fringed on both ends. Then I added a D ring and a stud to hold them together. 

Be sure to check out yesterday's blog post by Alex of Alextilalila Designs in Barcelona! Isn't it fun to have sewing friends all over the world? She made the cutest tote, you won't want to miss it! Tomorrow's stop is Terri Steele. Click here to see a lineup of all the links to the blogs participating. It's a great group with so much inspiration to share. Purchase Forest Floor fabrics at A Stitch in Time with free shipping!

Thanks for visiting! Happy Sewing and God bless! Maxie

Uncomplicated Quilting

Sometimes a quilter's life just calls for the uncomplicated quilt. One that can be pieced one day, quilted and bound the next, and enjoyed for years to come! Zippy Strippy to the rescue!

Pieced and Quilted by Sarah Overton. https://mycrowdednest.wordpress.com/                             photo by Callie Lynch

Pieced and Quilted by Sarah Overton. https://mycrowdednest.wordpress.com/                             photo by Callie Lynch

This pattern, available here, is perfect for showing off a full line of fabrics and how well they play together. I've made several in the past, but for this Zippy Strippy, I chose Forest Floor fabrics by Bonnie Christine for Art Gallery Fabrics. Art Gallery offered one of the prints from the line in voile, which I decided to use for the backing! Pima Cottons for the top, organic cotton batting, and billowy voile for the back pretty much guaranteed the softest, cuddliest quilt I'd ever made!

Bonnie Christine all wrapped up in Forest Floor Fabric!

We took to the forest to photograph Forest Floor for Art Gallery's Look Book, and since it was a little chilly, Bonnie took the opportunity to bundle up! She said it was her favorite quilt, just because of the softness of the voile. If you've never tried using this ultra soft fabric, by all means, give it a try with your next quilt. By the way, the term voile comes from France and means veil. As a proper southerner, I tend to pronounce it as if it rhymes with spoil, but here's a YouTube video sharing the correct pronunciation. I stand corrected. No matter how you say it, it's soft, drapey fibers are wonderful for quilts, garments, scarves, window treatments and more!

Bonnie Christine, enjoying a quilty embrace.

You'll find Forest Floor fabrics, with free shipping, here. While on the website, don't forget to check out Bonnie's other fabric lines, which include 100% Pima Cotton, Cotton knits, canvas and, of course, voile!

Soft, billowy voile for a quilt backing! Forest Floor fabrics by Bonnie Christine for Art Gallery Fabrics.

Thanks for visiting! Happy sewing and God bless! Maxie

Using the Silhouette Cameo Cutter to Repurpose Art!

So...we have been remodeling our home and I've been enjoying some DIY projects here and there. This one came from a gift from my husband. A little back story first...

We took almost 2 years to complete our little space, and the bedroom was practically the last thing on the list. We ran out of hardwood, so I had to settle for carpet. I researched my options and, for several reasons, landed on an organic wool from a wonderful company in Dalton, Ga.,  Earth Weave. They list on their website the many benefits from wool...did you know that it actually purifies the air? It was a splurge, but after all, my room was small. We planned the budget and decided to go for it! Installation day came, and it was as lovely and soft as I had hoped it would be. But it smelled of, well, sheep! Ok, a barn full of sheep. Wet sheep.

I figured the smell would dissipate, and it eventually did. But not until my husband had plenty of opportunities to tease me. One day he smuggled in a very old, framed canvas photo of sheep in a pasture and hung it in the room. He thought it was very funny, but I actually loved the picture so much that I decided to preserve it and make it mine by adding a sweet verse!

Silhouette Cameo Vinyl

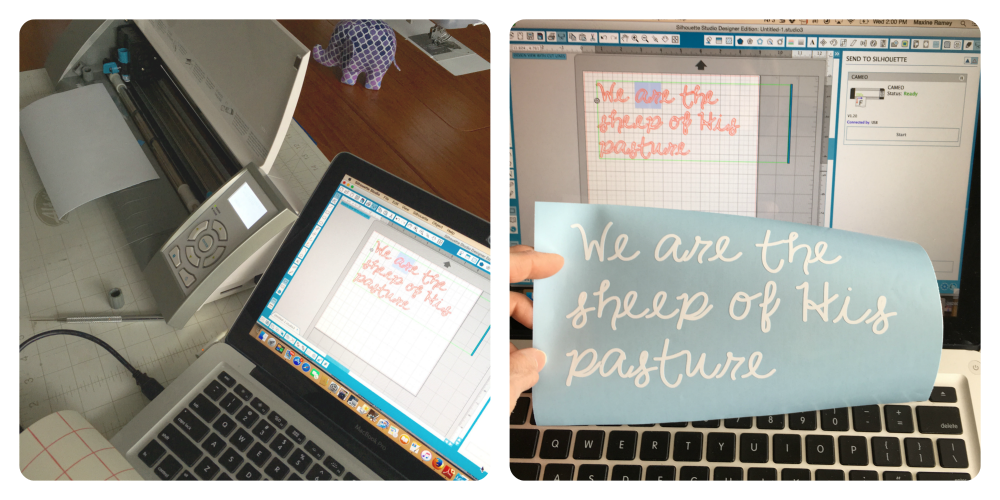
The scripture verse is not painted on the picture, but is vinyl that I cut with my Silhouette Cameo machine. The font was created by my daughter, Bonnie Christine, in her own handwriting! The Silhouette Design Studio software is so easy to use that it made the whole process fast and easy!

Silhouette Design Studio Software

I love that this font is Bonnie's handwriting. One day we were playing around with an IPad app that creates fonts from handwriting. She just whipped out A-Z and I saved it to my computer. Since the Silhouette automatically imports all the fonts on my computer into the Design Software, Bonnie's Handwriting was right there, ready to use!

Silhouette Cameo Cutter

I cut the words apart so that I would be able to place them exactly as I wanted them on the picture.

Vinyl Wall Clings with the Silhouette Cameo Cutter

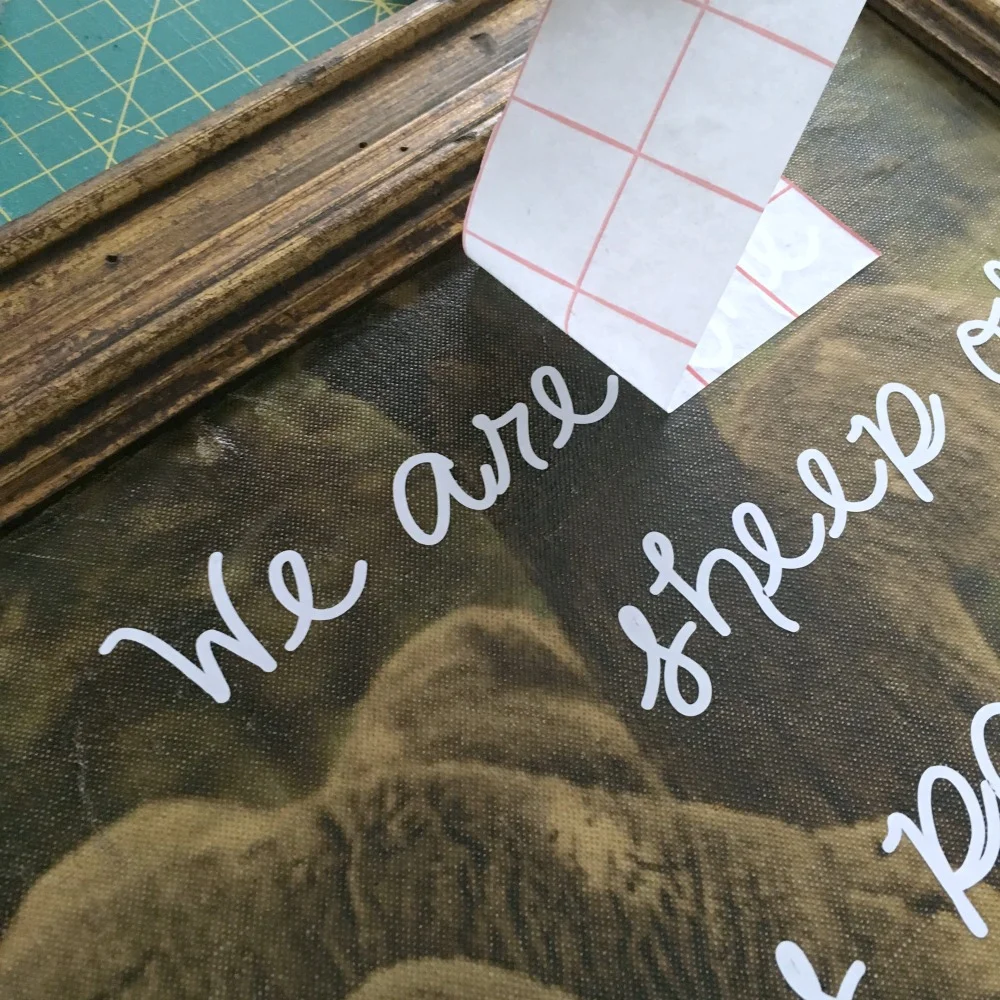
When transferring a vinyl decal, the first step is to place a piece of vinyl transfer paper over the top of the design. The red grid lines make it easy to keep things nice and straight. (First photo.) Simply peel it off it's backing, place it over the vinyl lettering and rub to transfer the letters to the grid transfer sheet. (Middle photo.) Peel up the transfer sheet and it's ready to set in place. (Third photo.)

Vinyl Wall Decals with the Silhouette Cameo Cutter

Place the transfer sheet in position and rub to transfer the lettering to the surface. It's as easy as that! And did you know that Bonnie also designs files for Silhouette? Check them out here! They coordinate with her fabric lines, but can be used for anything you can dream up! I have another DIY project in my head using one of her designs, so I'll be sure to share that with you soon!

And after it's all said and done, I love my wool carpet!

Organic wool carpeting

Thanks for visiting! Happy sewing (or cutting) and God bless! Maxie