The Zippy Strippy Quilt

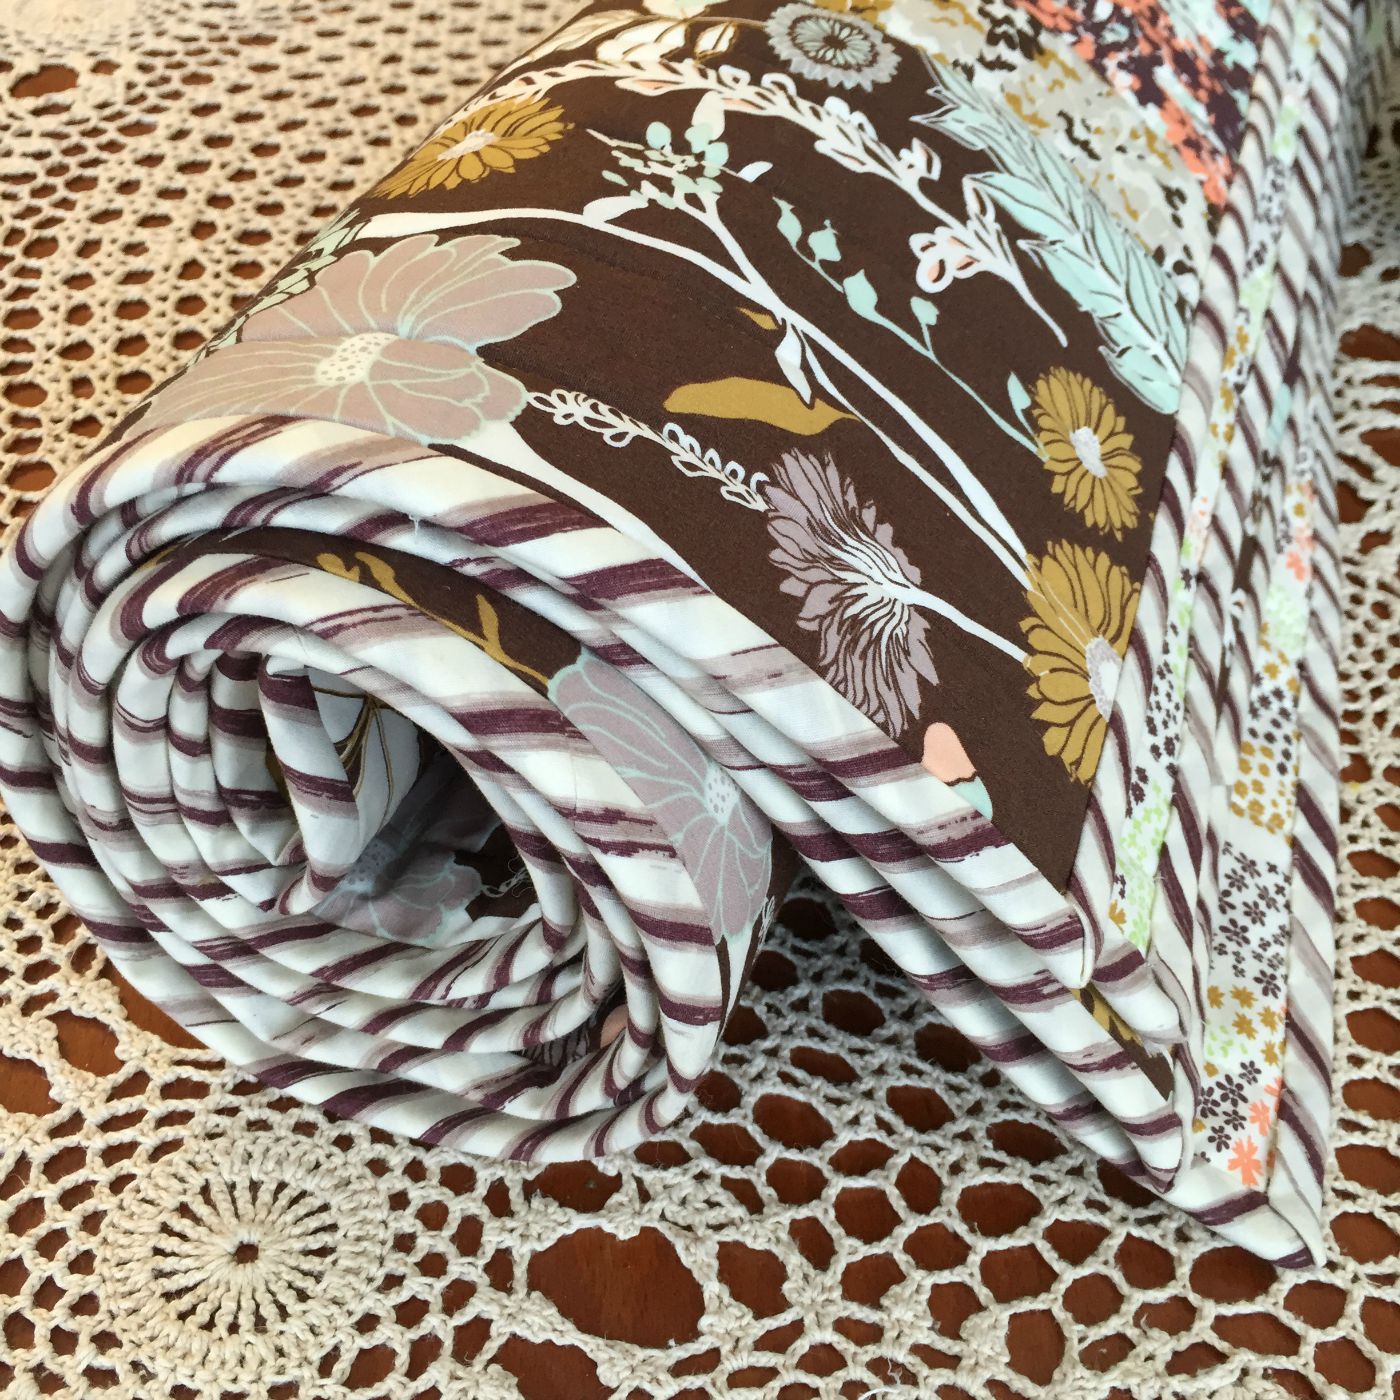
Need a fast, easy quilt design? This is it...make it in an evening, quilt it and bind it the next day. Honestly, it's that easy! I designed this pattern to showcase larger print fabrics that seemed just too pretty to cut into smaller pieces. Because you can utilize 14 different prints,  I've used it several times at my quilt store when I needed to show how a full line of fabric plays together. I call it Zippy Strippy, and you can see it below in Bonnie Christine's Cultivate fabric that she designed for Art Gallery Fabrics. Measuring at about 60" x 72", it's perfect for a sofa throw or youth bed. If you like it, you'll find the pattern on my downloadable pattern page!

Cultivate fabrics by Bonnie Christine play together beautifully in this fast, easy quilt.

Simple, straight line quilting with 100% organic cotton batting, and co-ordinating fabric on the back kept this quilt soft, drapey and snuggly! If you've ever sewn with Art Gallery's fabrics, you already know the difference their pima cotton makes in all your projects from quilts to clothing!

Zippy Strippy Quilt in Cultivate Fabrics by Bonnie Christine.

I used 12 fabrics for the center strips and two for the two side borders. Actually, there is a 15th fabric used for the bias binding! Isn't this little stripe great? We've included it in the kit, along with all the fabric shown for the top. Backing is available separately.

Bias binding from Cultivate fabrics by Bonnie Christine.

Thanks for visiting! Happy sewing and God bless! Maxie


Using Double Gauze Cotton in Quilting and Sewing

You may know that I've been occupied for the past two weeks with a new granddaughter, as well as helping care for my grandson, Bear! So, I thought it appropriate to show you some of the wonderful attributes of the dreamy fabric called Double Gauze Cotton and what cuddly soft receiving blankets and quilts it makes!  

Can't you just feel the softness of this quilt? It's made entirely with double gauze cotton: front, back and binding. Kudos go to Pam Hearn, friend/employee at my quilt shop for her sweet, original design!

What is double gauze cotton? Essentially, it is two layers of billowy cotton gauze, held together by a tiny inside stitch between the two layers, usually in a 1" grid. It's easy to cut and sew into just about any project you can dream of. Do you remember my Hemstitching 101 post? You'll see how I made the blanket pictured above using a hemstitch and a wing needle. Ollie thinks it's perfect.

Ollie Doe

You don't have to finish the edges with a fancy hemstitch...a simple straight stitched works over a double folded edge works nicely, too. Just purchase 1.25 yards of 44" Double Gauze and you'll be able to make a nice size square, like the ones pictured below.

Double Gauze Receiving Blankets
Double Gauze Receiving Blanket

Ollie likes this one, too!

Thanks for visiting! Happy sewing and God bless! Maxie


Buttons and Buttonholes and Tears, Oh My!

Why is the last task of a project sometimes the most dreaded? For me, I think it's because I want to be finished and on to the next thing! Sewing buttons on a hand made garment is usually my last task and discovering that I could attach them with my sewing machine was an "Aha!" moment! I'll show you how easily it's done in the video below, but first, let's make the buttonhole!

When I demo the great features of the Baby Lock sewing machines at my fabric store, one of the most frequent statements I hear is, "Oh, I don't do buttonholes!". I love seeing the customer do a complete reversal during their owner's training! The supplies for a successful buttonhole are shown below:

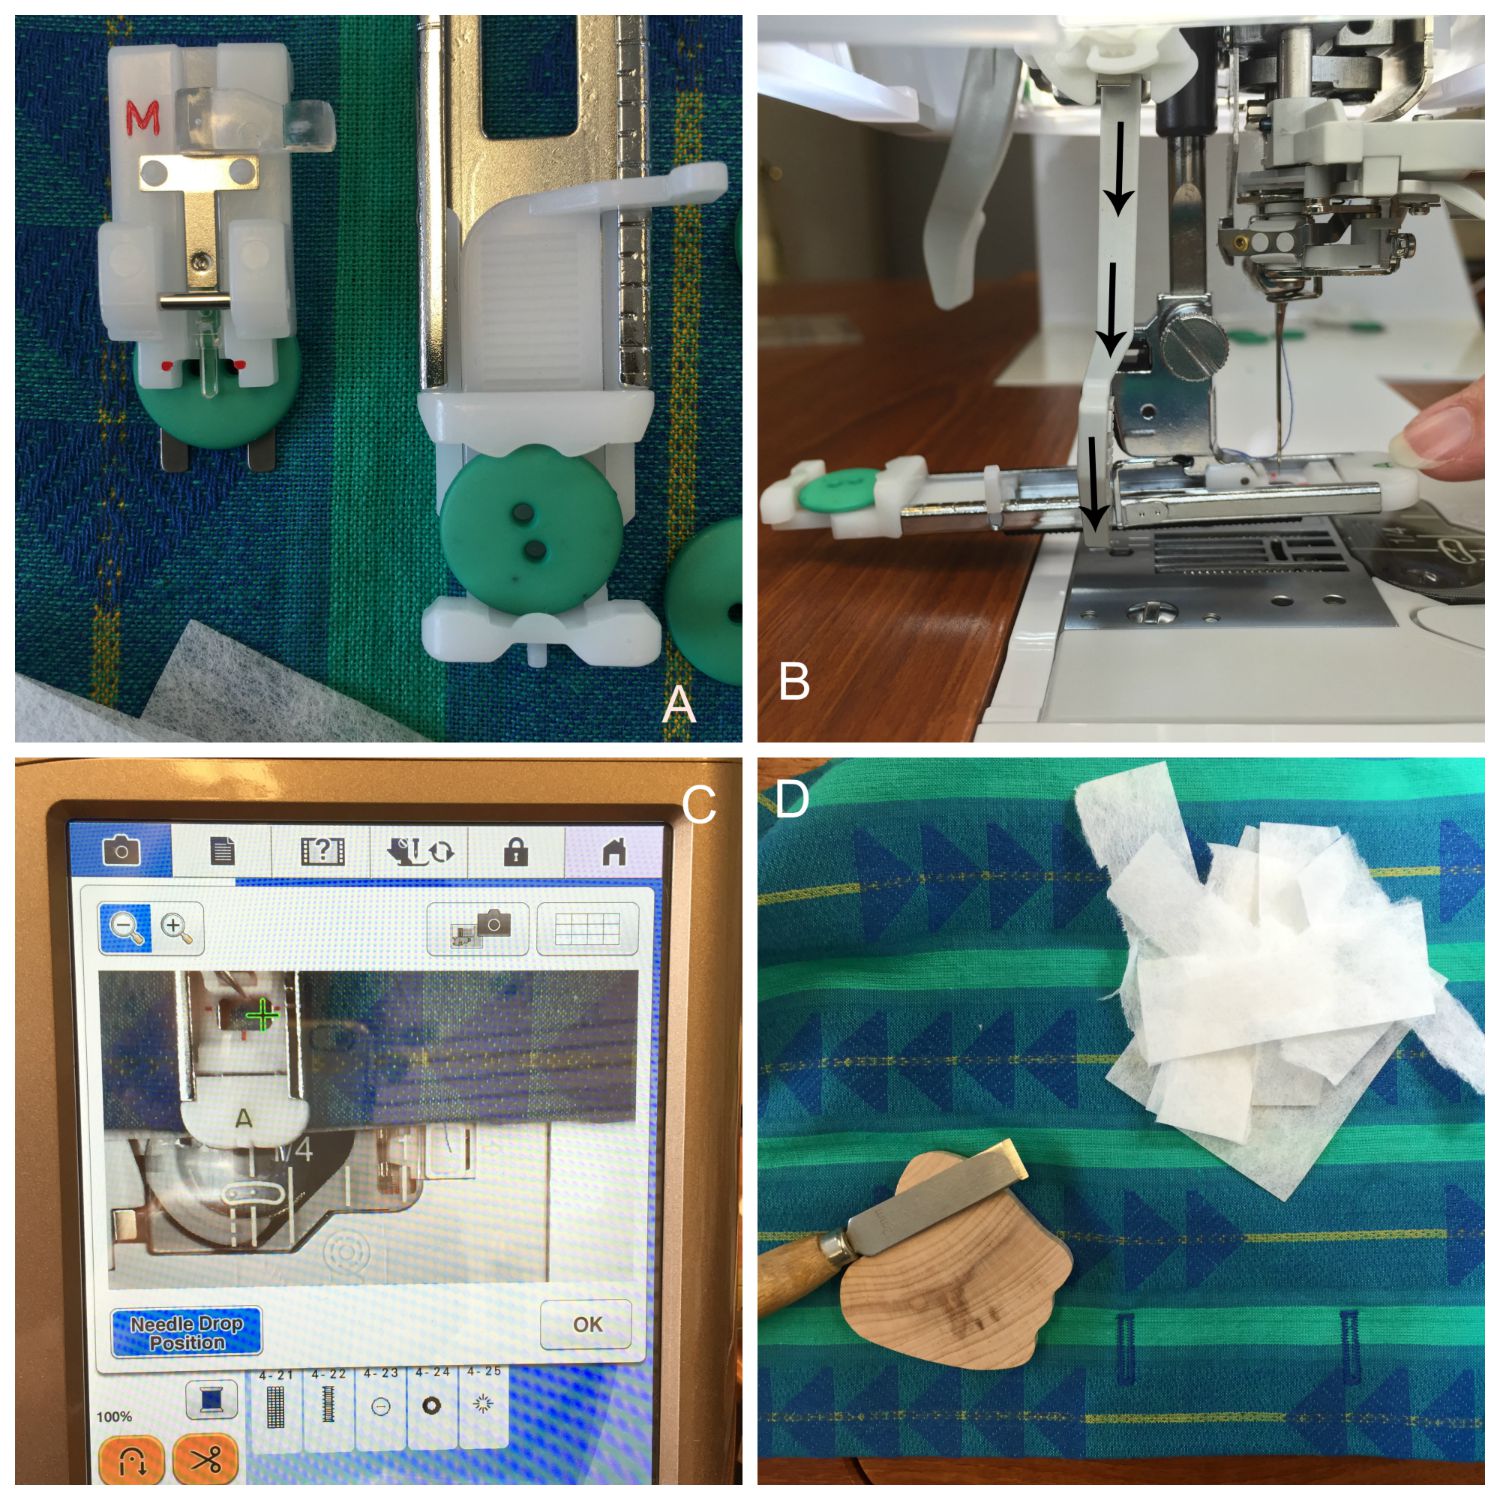
Supplies needed for making successful buttonholes, and for sewing on the buttons by machine.

You'll need to gather a small piece of tear-away stabilizer for each buttonhole, the buttons, your buttonhole foot (the larger foot shown above), and the foot for attaching your buttons to your fabric. Tip: I prefer to use cotton threads for making buttonholes because they always stitch nicer than polyester.

Steps to beautiful buttonholes.

Photo A: I love the buttonhole foot (the larger foot on the right) for my Baby Lock machine because you simply drop the button in the back of the foot, slide the back tab until it rests against the button and you're ready to stitch a buttonhole perfectly sized for your button! I am choosing a simple rectangular shaped buttonhole for my button, but there are other styles in the menu that are suited to shank buttons, knit fabrics and more! The smaller foot on the left is used for attaching the button to the fabric. It snugly holds the button in place during stitching. See my video below!

Photo B: The buttonhole foot is attached to the machine. On my machine, I pull down the buttonhole lever, which rests against a tab on the foot.

Photo C: Placement is extra easy when I use the camera feature on my Destiny machine. I get a 'Needle-eye' view of placement! Don't forget to slip a little piece of stabilizer underneath the fabric. Tip: When sewing buttonholes on thicker fabrics (wool, fleece, etc.) I also place a wash-away stabilizer on the top side.

Photo D: After the buttonholes are made, I remove the stabilizer from the back side and I use my Buttonhole cutter to safely & neatly open them. Tip: Run a bead of Fray Check through the center of the buttonhole before cutting and there will never be any unraveled threads!

And last of all...blissfully (and quickly) sew the buttons in place!

Thanks for visiting today! Happy Sewing and God bless. Maxie

Meet Sweet Ollie!

Taking a day off from the regular posting routine here, and let me introduce you to the reason why! You may know that my daughter, Bonnie Christine, has been expecting a baby girl. She was born yesterday morning in Asheville, NC, weighing 8 pounds 4 oz. Her name is Ollie Doe, and she's as sweet as can be. Let the girl sewing begin!

Ollie and Me

Thanks for visiting! Happy Sewing and God bless!
 Maxie

Sewing a Beautiful Dart with Only One Thread

I am an avid quilter these days, but garment sewing was my first love and I still love it. I hadn't sewn clothing for myself in quite a while, but for some reason I found myself wanting to make a blouse. I found a Butterick pattern (6085) that looked fast to sew with options for a straight fit or a curved fit. I opted for the curved fit, which meant sewing darts! I plan to share more construction tips in future posts, but for today, I want to share how I sew darts that are smooth and flat with only one thread in my machine!

Butterick 6085

There are definitely two practically identical blouses in the picture above. I loved mine so much (background) that I made one for my mother, too! So, let me show you how I made the darts. Believe it or not, this dart is sewn using only the bobbin thread! The purpose of sewing a dart in this manner is so that there will be no need to tie the threads or place a messy backstitch at the tip of the dart. Sometimes those tied threads can become untied and the tip of the dart will begin to open...impossible to happen when the dart is sewn using the following steps!

  1. Remove the spool of needle thread from the top of the machine.
  2. Pull up about 25" of bobbin thread from the bobbin. No need to remove the bobbin. (Below photo, left. The arrow is pointing to my blue bobbin thread. Click on the image to enlarge it.)
  3. Bring the thread up through the presser foot and thread the needle from back to front. That's right.
  4. Holding the slack in your right hand, thread the top of the machine beginning just past the spool holder. Make sure your presser foot is raised so the thread can pass into the tension discs as normal. Pull all the slack out of the thread from the top and let the thread tail hang freely. (Below photo, right.) Click on the image below to enlarge it.

Now we are ready to sew our dart! The fabric is folded and marked (below),  and I've placed a couple of pins in the fabric to hold it in place at the machine.

Marking the dart.

The photos above show the fabric placed under the presser foot at the narrow tip of the dart. The fold is resting against the blue thread (shown better at right, near the stiletto tip). Don't allow any space between the fold of the fabric and the thread. Lower the presser foot and sew the dart. Do not backstitch here!

There! The tip of the dart is smooth and can't accidentally open at the narrow tip!

Thanks for visiting! Happy sewing and God bless! Maxie