Make an Easter Apron Tonight!

Just in time to make that strawberry pie, this apron is a quick project, perfect for your cooking day on Easter or to tuck into an Easter basket as a gift! Made from a tea towel, nothing could be easier or faster to create. You'll be in and out of the sewing room in no time!


Tea Towel Apron

Supplies include a tea towel (I used Riley Blake's Bunnies and Cream towel and prints), 1/2 yard fabric for a ruffle and pocket, 1/4 yard for neck/tie strap and a scrap for the applique monogram.

Want to fancy it up a bit? Try adding an applique´monogram. I chose a circular monogram, like this one from Designs by JuJu, stitched on my Baby Lock Destiny. Using the camera for placement made it a breeze to center.

Applique´Monogram

After stitching the monogram, the first step is to shape the apron by trimming away a triangle from each top corner. Refer to the photo below to see the approximate size to trim away. Nothing is concrete here, just trim the corners, bearing in mind that you will fold about 1.25" to the back side and stitch along the edge to form a casing for the neck strap/ties.

Trimming the apron.

Next, round the bottom two corners. Serge or zig-zag all the raw edges. Press under 1/4" on the top, angled corners and fold about 1.25" to the back side. Stitch along the pressed edge to form the strap casing. Make the strap by cutting three 2.5" strips, width of fabric and sewing them end to end. Sew into a long tube and turn. A tube turner is your best friend here! For this long strap, leave the opening for turning in the mid-section. This allows you to stitch across each end for a nice finish, and turning half the tube at a time is much easier than turning the whole long tube.

Narrow hem foot. With a lamb.

For the ruffle, cut three 4" strips, width of fabric. Stitch together end to end. I like to use this rolled hemmer foot to finish each long side of the ruffle. It leaves a very professional, clean finish. Practice just a bit and you'll be a pro!

Ruffle edge with a narrow hem finish.

Fold under the short ends of the ruffle strip twice and stitch in place to finish the ends. Gather the ruffle strip to fit the apron's edge, beginning and ending at the bottom of the strap casing on each side. Lay the gathering over the serged/zig-zaged edged, overlapping the edge by about 1/2", and straight stitch it in place.

Run the tie/neck strap through the casings and toss on a sweet little pocket, if you like, and you're finished! Enjoy!

Thanks for stopping by! Happy sewing and God bless!

Maxie

Machine Embroidery, Sweets for the Sweet!

I've been a fan of Evy Hawkins' work for a while. You may be familiar with her beautiful Sashiko techniques, or her monograms and embroidery designs, or her machine cutwork (she teaches a Machine Embroidered Cutwork Class on Craftsy). Her website is a wonderland of delicately beautiful needlework, ranging from quilting to hand embroidery. It's packed with projects, tutorials and inspiration, so brew a cup of tea and have a visit with Evy!

Baby Deer Embroidery Design by Evy Hawkins

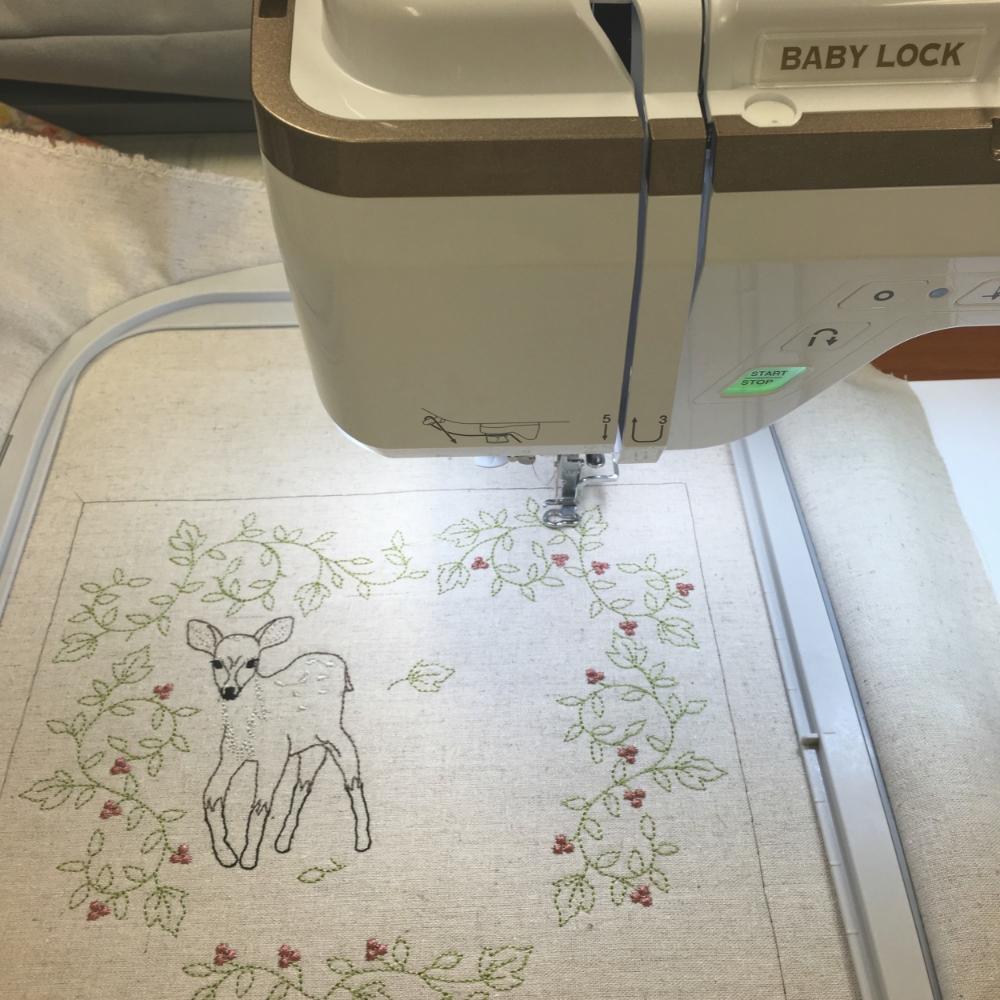
When I first saw her Baby Deer embroidery designs I knew I had to make something for my new granddaughter, Ollie Doe! I could hardly wait for the 5 second download to complete. By the way, she offers this for both hand and machine embroiderers.

Baby Lock Destiny Sewing and Embroidery Machine
Baby Deer by Evy Hawkins (abitofstitch.com)

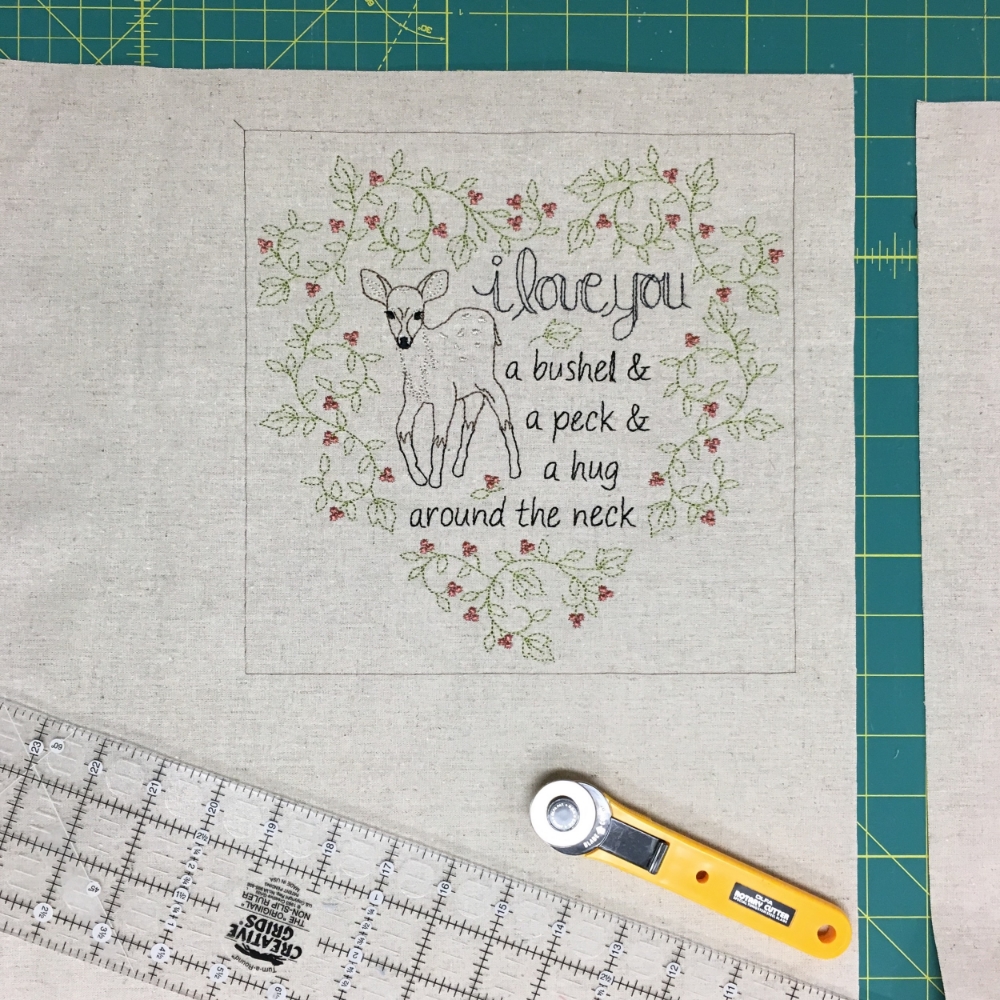
My Baby Lock Destiny stitched it out perfectly! Tip: My machine has an optional basting feature, which adds a basting stitch around the design, spaced perfectly around four sides. Before removing the stitches, I used them to square up the embroidery piece perfectly! I simply measured 1" off the stitching line and trimmed. See photo below. Ready for the borders!

Using the basting stitching line as a guide for trimming.

I added 3" borders of pink check printed linen and piping and it was ready for little Ollie's visit in no time! Thanks, Evy, for your beautiful work!

And thank you for visiting! Happy Sewing and God bless. Maxie

Sewing with Knit and the Shell Tuck Edge Stitch

It's about time I turned out some baby clothes, don't you think? Grandaughter #1 is due in about 2 weeks! Thankfully, my Baby Lock Serger and Sewing Machines help me make haste, while making me look good at the same time! So today, I'm sharing a wonderfully fun technique that gives special detail when special is called for! I'll be using Bonnie Christine's knit fabric for Art Galley Fabrics, and the Celebrating Baby Newborn Gown patten that you can download free from Rachel at  Stitched-Together.com. Bonnie also has knits for her Hello, Bear line and her Winged line; if you love Art Gallery's pima cotton prints, you're sure to love their luxurious knits!

Stitched-Together Baby Gown

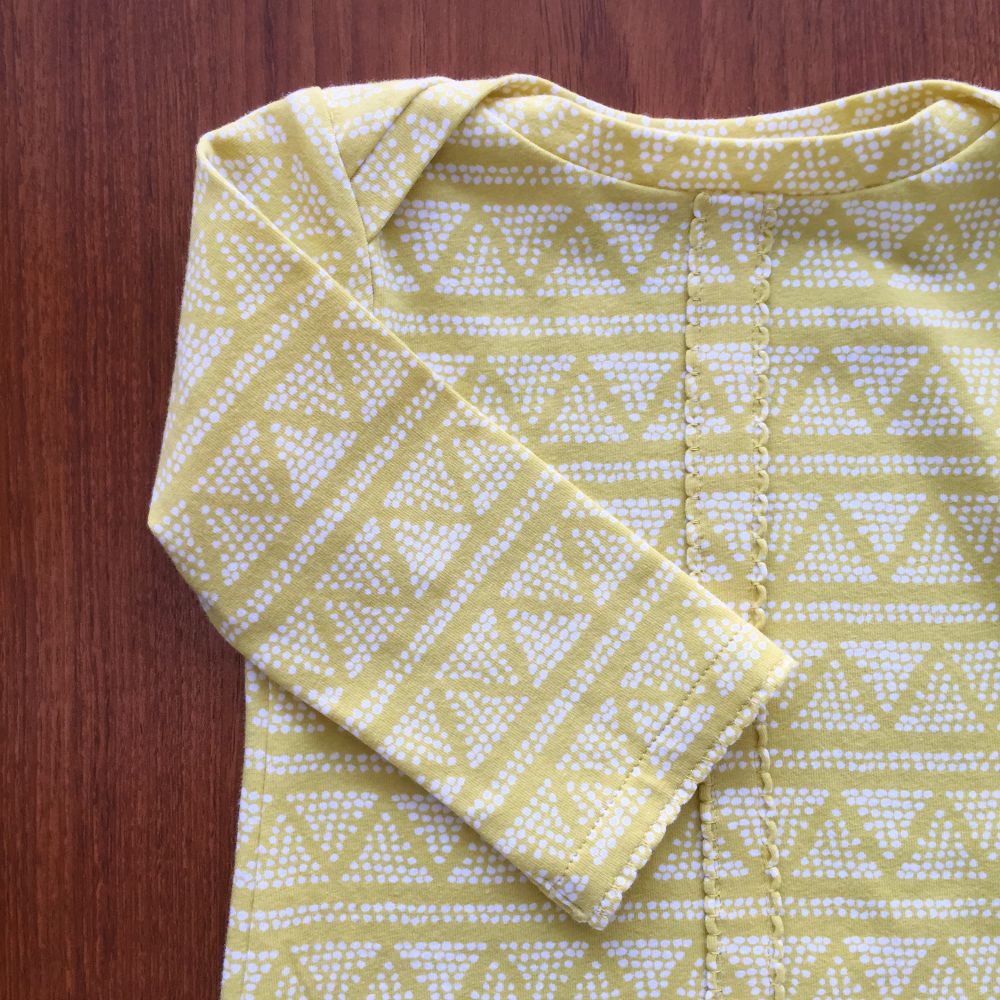
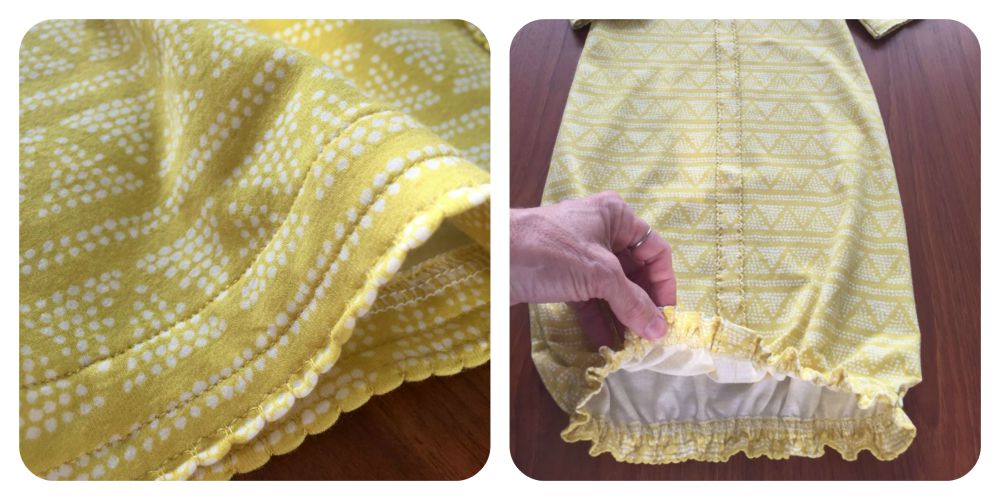
Notice the sweet edging stitched along the hems of the sleeves and down the front of the 'pleat' on the front of the gown. It's called the Shell Tuck Edge, and it's done completely by machine! If you have a machine with assorted stitches, it's very likely there. Read on and see!

Shell Stitched Edge

The first thing you need to do is to hop over and download the pattern from Stitched-Together.com. The front accent is not part of the pattern, but easily made by moving the pattern off the fold 3/4", as shown below. By the way, do you use pattern weights? I love to use these that were gifted to me from Sarah Overton; you can make your own from the instructions over at Tea Rose Home.

gown front from Stitched-Together.com

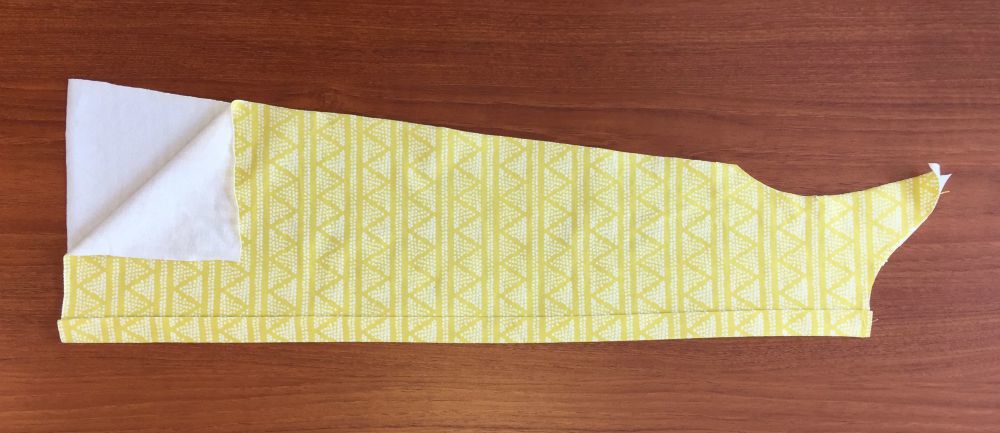
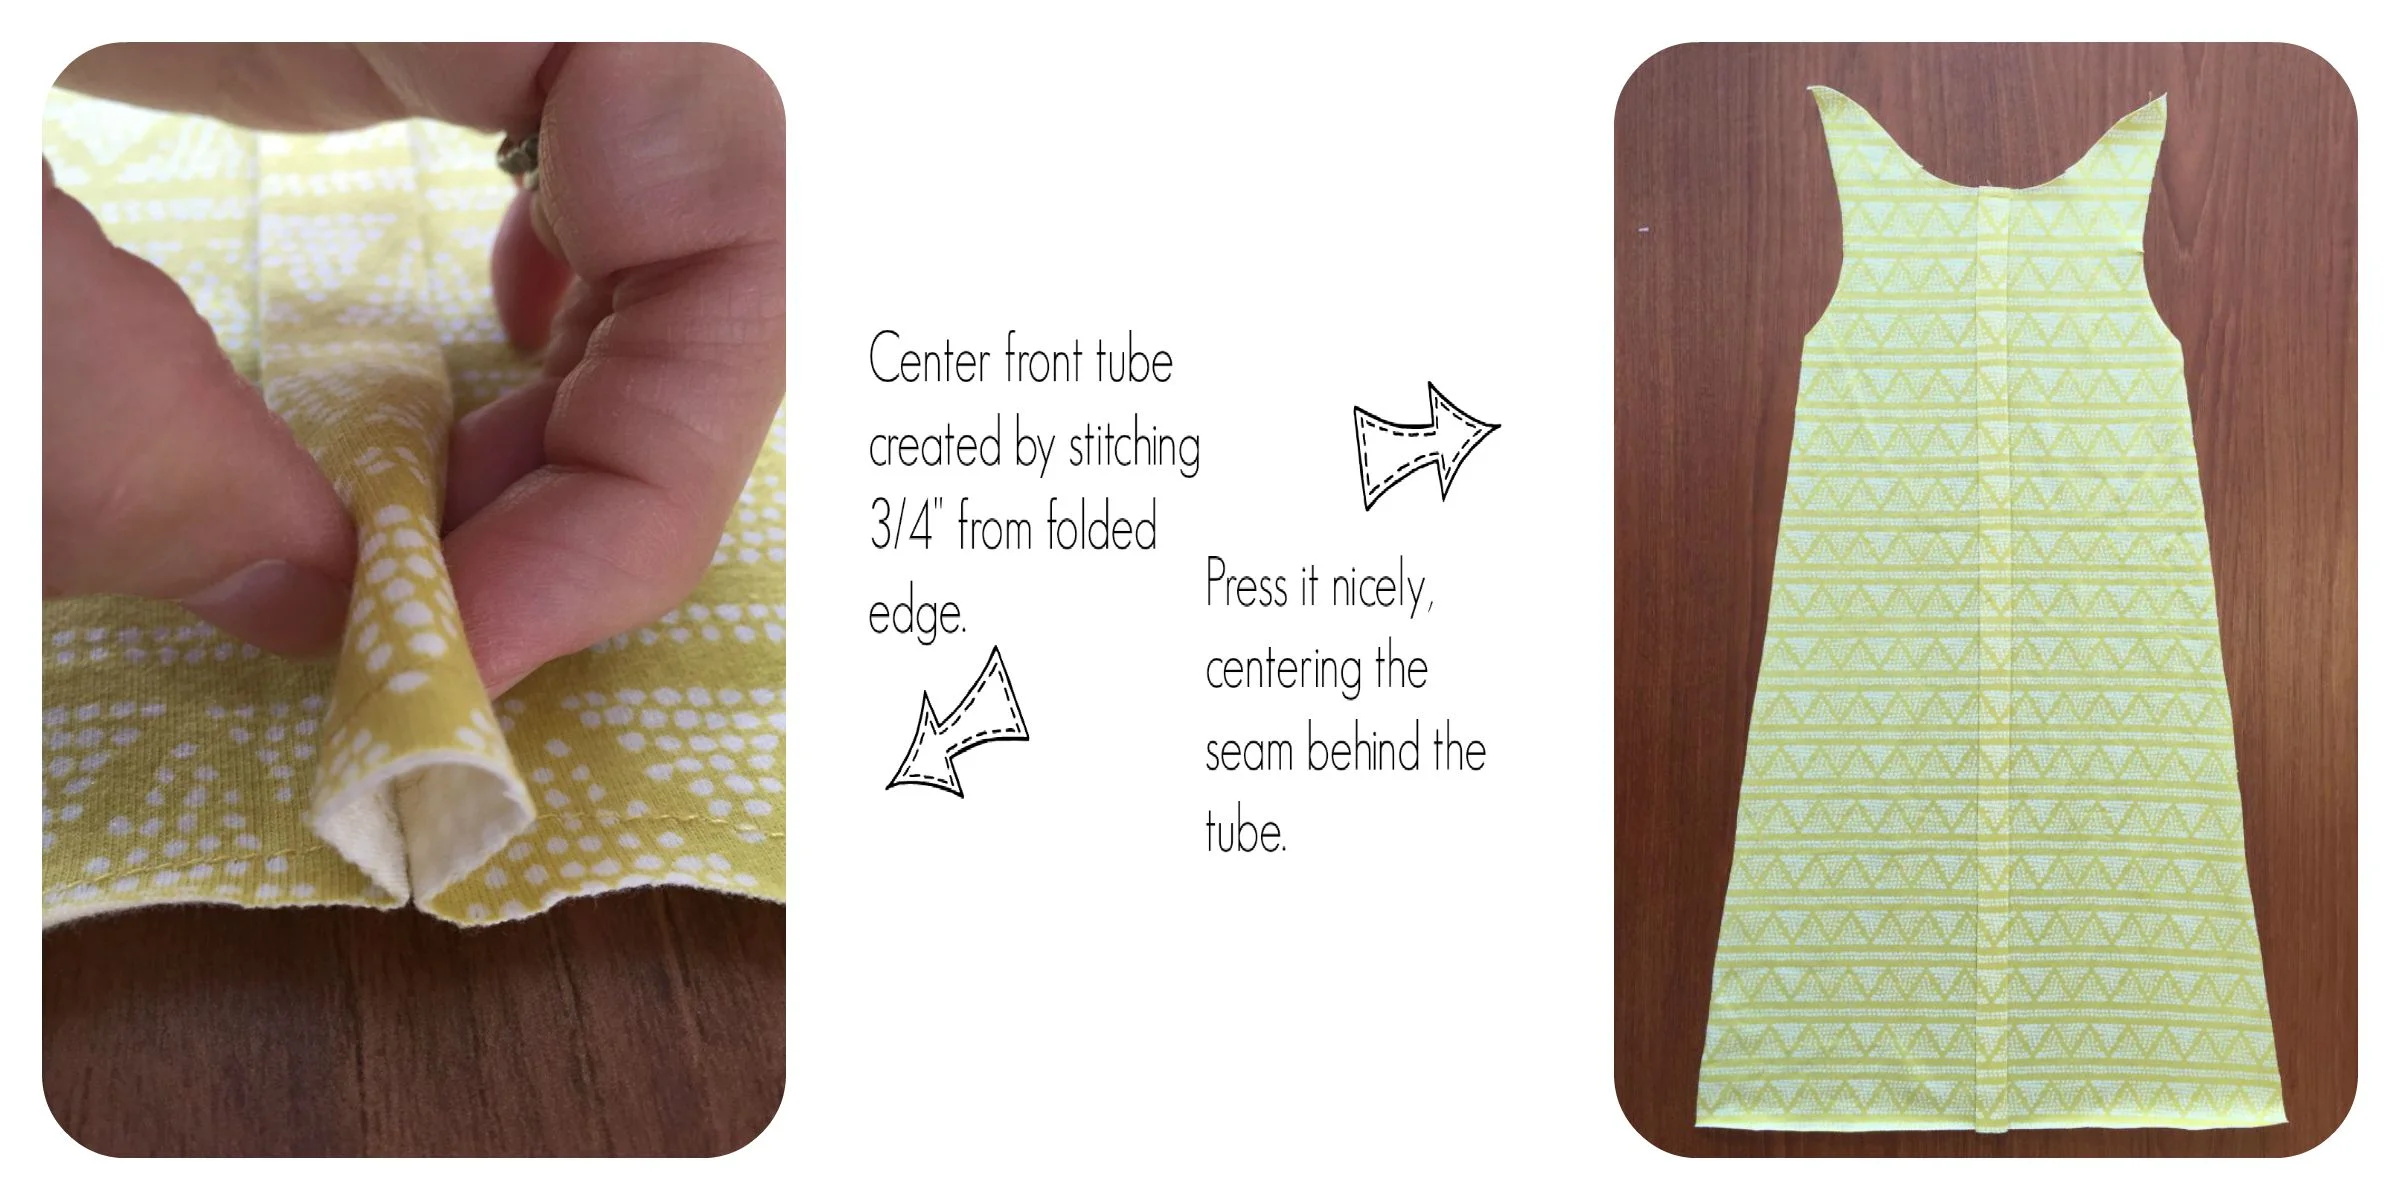
Cut out your gown front, and while the pattern is still in place on the fabric, draw a line right next to the pattern piece (3/4" off the fold) with an iron-off marker. With the fabric still folded wrong sides together, put a few pins in the fold and stitch on this line. This will create a little tube on the front center. Press it flat, centering the tube over the seam, as shown in the photos below.

gown front

Fold the gown front wrong sides together, so that one side of the folded edge is extended. We will create the Shell Tuck Edge on both folded edges, working with one side at a time.

folded gown front

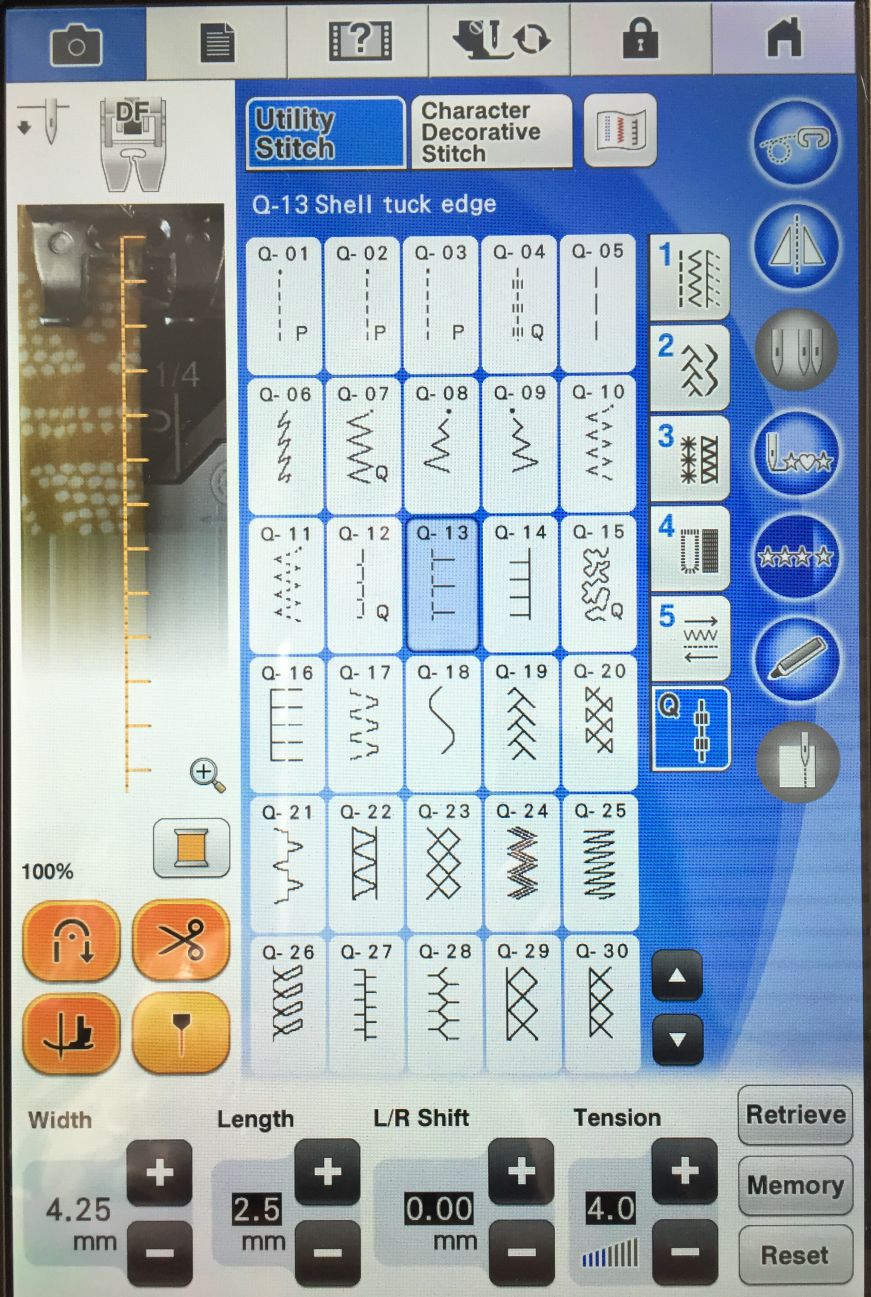
The next step is to set up the stitch on the machine. The picture below shows my Baby Lock Destiny's screen. The Shell Tuck Edge is stitch "Q-13" (highlighted in blue, below). It looks somewhat like a blanket stitch with three straight stitches between the right-swing jumps. Notice the width and length settings that I've adjusted to suit my knit fabric. Play around with your settings on scraps of your actual fabric and make adjustments to your liking. One more thing to note on the screen below: The Destiny has a built in camera that will allow you to view your actual fabric under the presser foot with a superimposed image of the chosen stitch, in actual size. This allows me to adjust my fabric precisely, and to see how the stitch will fall in place. Thank you, Baby Lock! You can see in the camera image that I am allowing the right-swing jump to fall off the folded edge of the fabric, with the stitch landing in the air. This is exactly what I want to happen because the thread will grab the fold and pull it over, creating a little scalloped edge! Note: this stitch is beautiful on woven cotton fabrics, too, especially when the fold is on the bias grain.

Using the Shell Tuck Edge Stitch on Baby Lock Destiny.
Shell Tuck Edge Stitch on Baby Lock Destiny

Beautiful, right? Imagine this stitch on other things. For example, how about on the folded edge of a 1.5" bias woven cotton strip for a beautiful piping insertion that would be wonderful slipped under a quilt binding edge!

Celebrate Baby Gown front

With the first side of the front accent completed, fold the gown wrong sides together once again to expose the opposite side of the folded center tube. Repeat the Shell Tuck Edge for this side.

Continue to sew the little gown as directed in the pattern. I made a couple of changes to my version. First, instead of binding the neck edge, I folded the strips in half lengthwise and serged them to the neck edge with my Enlighten serger. (This serger threads itself, by the way!) This method is much faster and gives a nice smooth finish in one step.

Baby Gown Neck Edge

The second change was to use the Shell Tuck Edge stitch on the lower hem, shown below, and sleeve edges as a finish.

Baby Gown Hem

I hope you'll give the Shell Tuck Edge stitch a try! I'm sure you'll find lots of places to apply it's delicate touch!

Thanks for visiting! Happy Sewing and God bless! Maxie

Easy to Sew Bag Handles

I made another bag...and this one is for me! I made sure of that by embroidering my monogram on it so that one of my daughters couldn't 'call' it. (I'm not sure where that started, but if they want something of mine, they think that the first one who 'calls' it gets it.) Since their initials are different from mine, this bag is safe in my arms! Today I want to share a new way of making handles...the way they attach might surprise you, and I have an embroidery tip for you!

The Perfect Whatever Bag by Maxie Makes and Bonnie Christine

The pattern is the Perfect Whatever Bag, designed by my daughter, Bonnie Christine and me. I've posted in the past about this free, downloadable pattern, but today called for another post because of the new variations. This bag pattern is so versatile. If you make it, please send me a picture of your version! I used a canvas border print (I yard, 60" wide) for both the inside and outside of the bag, flipping the lining so that the blue check was at the top inside of the bag. See the pattern for cutting measurements and instructions.

Cutting the fabric for the bag.

I decided to monogram the bag with an applique´ made from the leftover scrap of blue check fabric. It fit just perfectly! I monogrammed a sample first, and discovered that the tearaway stabilizer made a perfect template for placement of the final monogram. I simply creased the center of the fabric and stabilizer and placed the creases together to find the exact center.

Marking the embroidery placement for the bag front.

I love my Baby Lock machine...      Love the font? I found it here.

The Baby Lock Destiny makes it easy to design your own monograms! This monogram is applique´d with a simple oval frame surrounding a fancy font for an elegant look.

And I just had to sew a little ric rac trim on, right? Pink, please.

Sewing the ric rac trim on The Perfect Whatever Bag.

So, from here on out you'll just follow the instructions in the aforementioned free downloadable pattern. Except for the handles. Since I didn't have any leather pre-made handles on hand, I would have to make them. I wanted a very fast and easy way to make and attach them, too, because my Saturday was running out. This method sort of just happened without a master plan, and I loved them in the end!

The Perfect Whatever Bag Handles.

To make the handles:

  1. Cut two 2 1/2" x 27" strips.
  2. Fuse a lightweight stabilizer on the wrong side.
  3. Sew them into a tube, sewing the ends closed and leaving a 2" opening along the center area for turning. 
  4. Turn each end right side out through the center opening. I used a tube turner for this step.
  5. Press well and topstitch around all the edges, stitching the opening closed.
  6. Measuring 3" in from each side of the bag and about 1.5" down from the top, make a mark for placement.
  7. Pin the handles in place as shown in the photo below. Stitch from top to bottom, as indicated by the black arrows. I stitched twice to reinforce the handle attachment.
  8. Tie the end of the strap in a half knot by holding the strap up in the center and wrapping the short end over, around and down through the loop. Pull snugly to form a knot.
handleplacement.jpg

9. Love it! Sturdy handles, easy and fast. Saturday even still has some daylight left.

Knotted bag handles on The Perfect Whatever Bag.

Thanks for visiting today! Happy Sewing and God bless! Maxie

Ric-Rac Quilt Binding

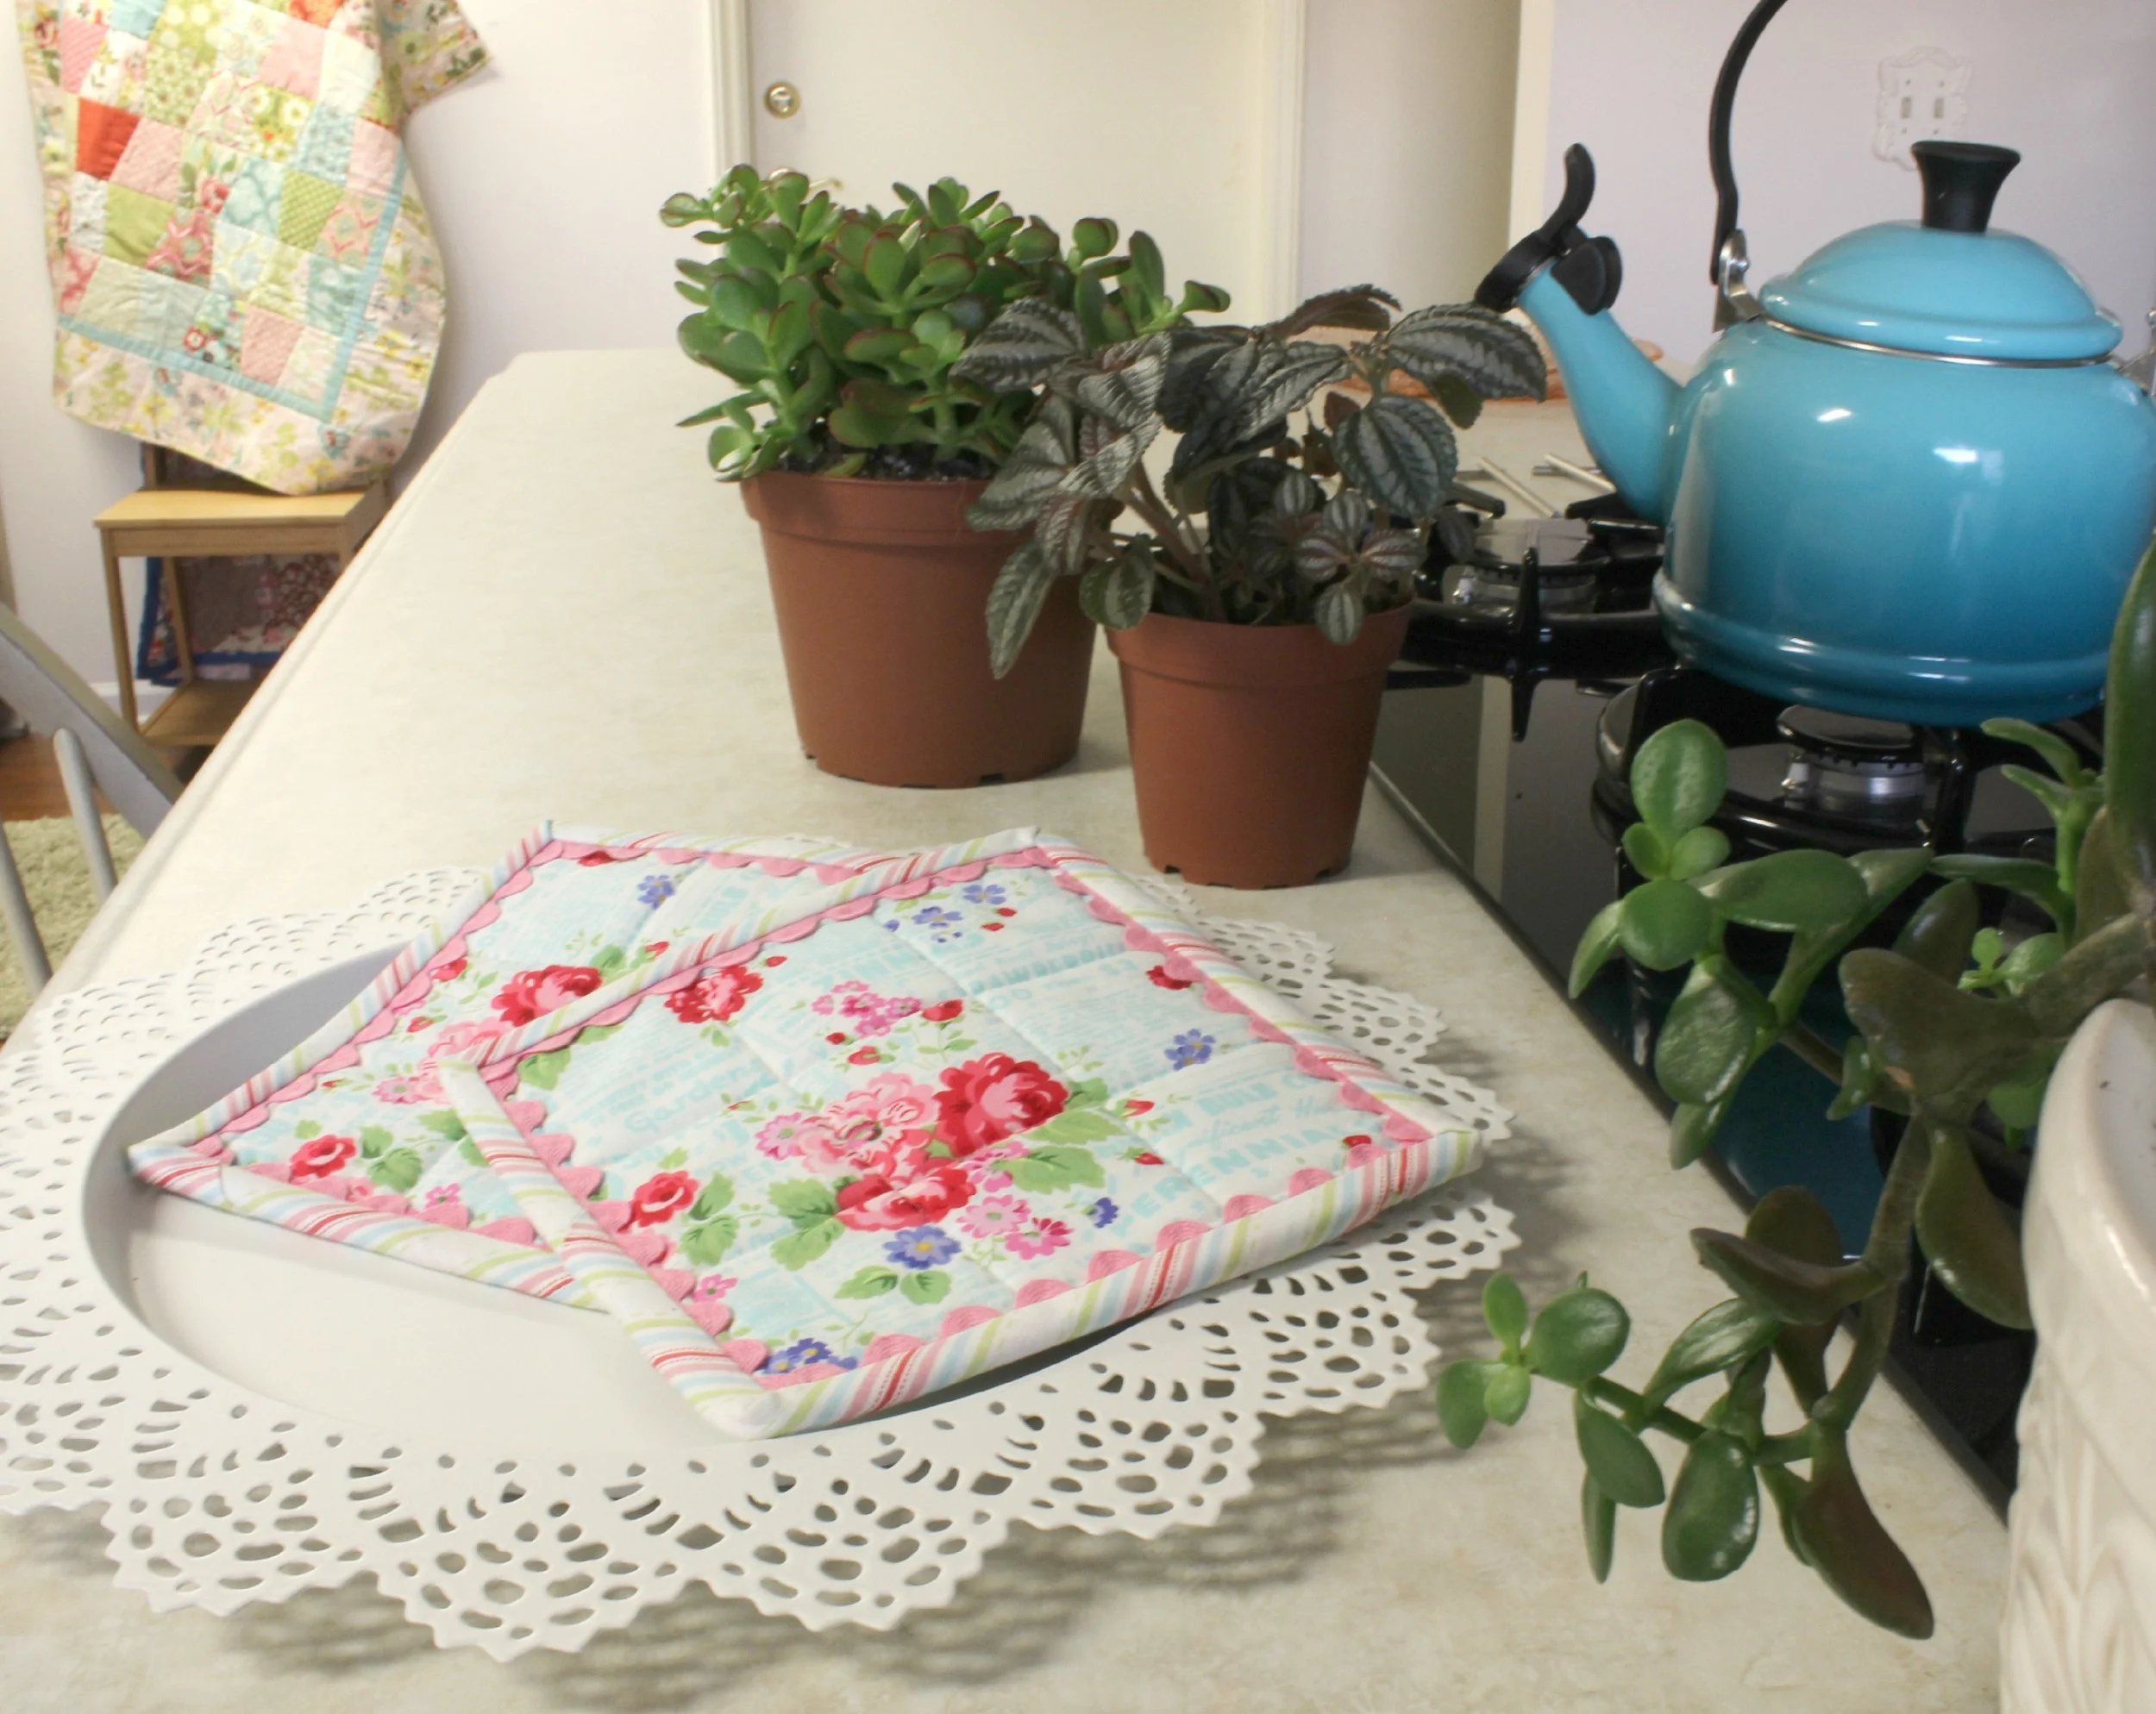
I posted this photo of my ric rac quilt binding on Instagram and Facebook this past weekend, and received some requests for a tutorial! Here ya go...!

Ric Rack Quilt Binding

It sure made a sweet little edging on this quilt, and it was so easy to do! (If you need help with bias binding, refer to last Friday's post.) The photos below demonstrate the technique on a pot holder, but it is applied exactly the same on a larger quilt. This ric rac is about 1/2" wide, and fits perfectly in the binding's seam allowance. If you use a different size, just adjust the alignment of the edges (as described below). I use a separate piece for each side so that I don't have to fold it in the corners. This makes for a neater corner with less bulk. Click on the images below to enlarge them.

1. The first photo shows the rick rac placed even with the edge of the quilt. Let the ends extend a bit past each corner; it will be trimmed later. Cover the ric rac with the binding, placing it as you normally would when attaching it to your quilt. I don't find it necessary to pin or baste the ric rac in place, even on a large quilt. A walking foot is helpful. My Baby Lock's belt-driven walking foot (available for several models) does a super job of keeping all the edges even!

2. Stitch in place, stopping every few inches to make sure the ric rac is still sandwiched evenly, and at the edge of the quilt. Stop sewing a little more 1/4" from the end at the corner. This small amount of extra distance is helpful when slipping in the next piece of ric rac, and it doesn't affect the miter.

3. Lift the binding and place another piece of ric rac on the next side, making sure the edges extend past each corner.


4. Miter the binding as you normally would.

5. The ends of the ric rac will extend beyond each corner. After stitching all four sides, trim the ends away, removing as much bulk as you can. Be careful that you don't accidentally cut the binding!

6. The last photo shows the potholder with the ric rac trimmed, the binding attached and ready to flip to the back side.

Flip the binding to the back side, mitering the corners. I love Wonder Clips, do you? I have to admit that I was skeptical at first because I had lived without them for my whole sewing life. Then I used them. Devoted! I use them for holding heavy seams together on things like tote bags and wallets. No pins needed! The back side is flat in order to move smoothly across the bed of your sewing machine. Tip: I keep my favorite needle for stitching binding right in the box of Wonder Clips! Back to the potholder: stitch the binding in place and and your ric rac binding is complete!

Ric Rac Quilt Binding Tutorial

Thanks for visiting! Be sure to sign up for the MaxieMakes email list! Happy sewing and God bless. Maxie