Planning a Quilt Design

I had several sweet comments and email responses to  my earlier post this week, On Sharing our Work (Quilts)! Thank you for each one! I thought I'd address a couple of them today. Carole asked how I had planned the quilt design and would I mind sharing that on a future post.  I'm happy to share how I map out designs, and I bet all my readers would be interested in your approach as well, so please leave a comment and tell us how you work!

Planning a Quilting Design

The quilt, "Pinwheel Galaxy", pictured above and in the previous post, is actually my quilt shop's quilt for the 2015 Carolina Shop Hop, which begins July 17. There are 12 participating shops, and each shop designed a star block for the hop, as well as their unique quilt design that includes all 12 blocks.

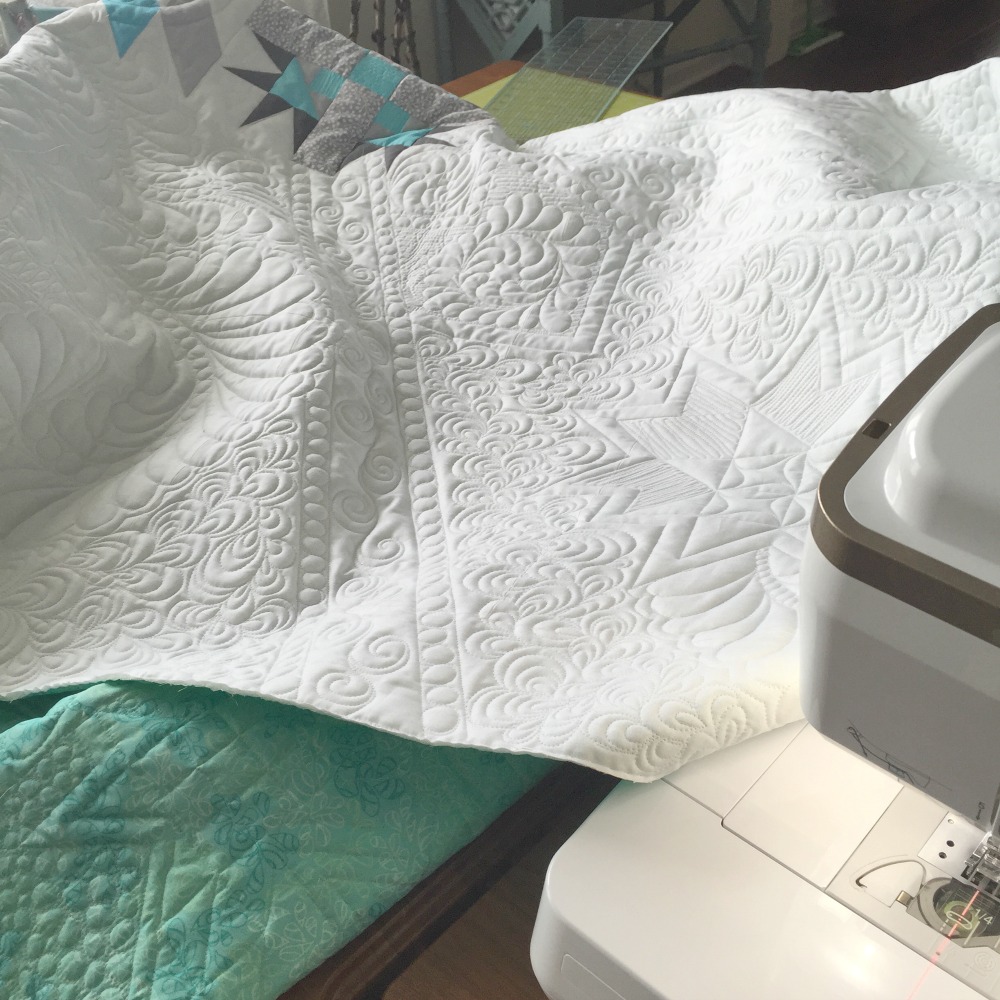
Now to Carole's questions. "Is your background quilting done on a long arm or standard machine? Do you plan where to put feathers, stars, circles, in your background quilting, or do you start with one placement and let it run, and then see what will fit in the left over space?"  I work on a Handi Quilter long arm machine, freehand. I appreciate computerized quilting, but I just enjoy moving that machine myself! As for the planning of the quilting design, I prefer to have a basic idea of what I want to do before loading it on the long arm. I use EQ7 quilt design software to design most of my quilts, which allows me to print copies of the quilt. I print several, and then draw quilt designs over the image to see what might work. For this quilt, I enlisted the help of one of my employees, Sarah, by handing her an image and a pencil and said "go to work on this!". Sarah is so creative and having another set of eyes look at the quilt brought a different perspective to the table.

I knew that I wanted to repeat a few of the star shapes in the white negative space, so I made templates of three of them and drew them, randomly, on the white background fabric. I use an iron off marker for this, and I keep an iron at my long arm machine. As soon as I stitch over the line, I iron it away because it will distract me later if I leave it visible.  When you draw a line for quilting, remember that it's only a guide. I rarely stitch right on it! When I quilt a feather, I first draw the spine in the general direction I want the feather to flow, quilt on that guide line, iron it away, and then fill in the feathers. Oh, and my thread of choice is clear Monopoly by Superior Threads.

Free Motion Quilting

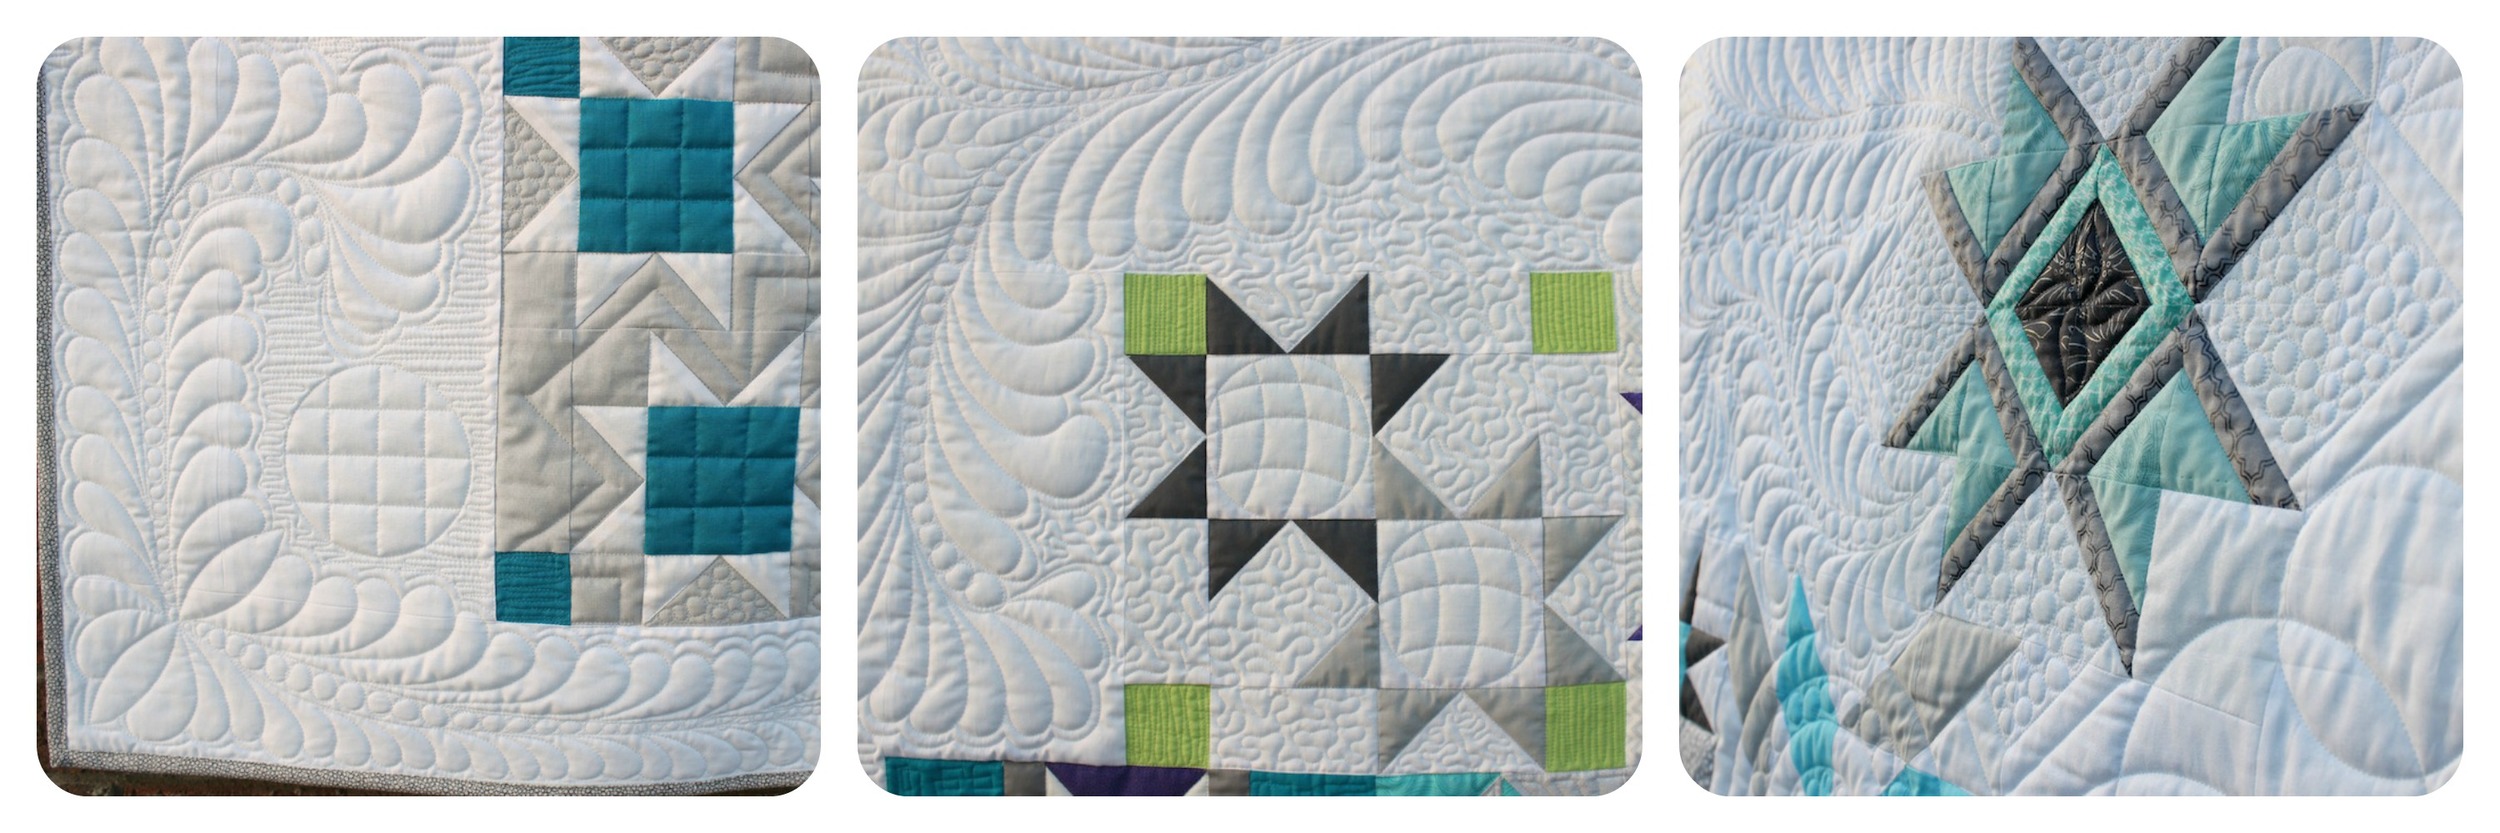
I tried to quilt each block in a way that might lead out onto the white fabric surrounding it, hoping that the quilting and feathers flowing from the stars would create movement. Smaller areas were outlined with double straight lines and filled in with various elements or background fillers. I use rulers for straight lines, circles and curves wherever I can. I always use a ruler for a circular feathered wreath spine because if the spine is perfect, the wreath will look good even though my freehand feathers are not perfect! (Remember - "Finished is better than perfect"!) I also tried to relate one area to the next in some places, like the circles above the wreath and next to the star block with concentric circles. I used pebbles as a constant theme throughout to help anchor it all together. For sure, some of the designs just had to happen as the space became available. In fact, when I unrolled the finished quilt, I discovered an unquilted area that I had skipped over earlier because I just couldn't decide what to put there! So, I mirrored what was in the opposite corner and it seemed to work.

PMM also had a sweet comment that I'd like to share, "I can't decide whether to contemplate the profound meaning- tightly boxed in at the bottom, stars break free and fly, sort of like you did with your sharing- or just to look in detail at every bit of quilting-piecing-design eye candy. I will enjoy it both ways, I am sure, as will your family. And thank you for your mother's quote- just what I needed...". It made me so happy that she saw those stars breaking loose!

I also have to say that I've learned a lot from some wonderful quilting teachers. You might like to check out the Craftsy Classes by Angela Walters, Christina Cameli, & Cindy Needham. And perhaps my favorite teacher of all is Kimmy Brunner. Remember, it's a process and we never stop learning!

So, how do you plan your quilting designs?

Thanks for visiting! Happy sewing and God bless! Maxie

On Sharing Our Work (Quilts)

Why can it be so difficult to share our work? I've been thinking about this today, particularly after I shared a picture of a quilt on Instagram that I'd been working on. I have to admit that I have intimidations when it comes to sharing something from my own creative thoughts. Questions swirl through my mind, like, "What if I'm the only one that thinks this is a good idea?" Or, what if they say, "What on earth was she thinking?" What if they see my mistakes? (Angela Walters says to never point those out!)

Our work is a process, right? Each project should be better than the last, if only in small measurements. I once heard someone say that if we aren't a little embarrassed by where we were a year ago, shame on us. I think that can be true for a lot of areas of our lives. Everything is a journey, and quilting is no exception. Enjoy the ride, as they say.

I also thought about how much I love seeing other quilter's work, whether I'm pouring over magazines or looking online, or walking through a quilt show. I bet you do, too. We celebrate each one, our particular style or not. The beauty is in the heart that made it. Gulp...so here's my quilt:

Pinwheel Galaxy Quilt

While working on this quilt gave me ample time to critique every stitch, I was also reminded of something my Mother used to say after working for so long on a project, "I do believe I've looked the pretty off it!"

So, whether you're a beginner or a seasoned quilter, go out there and share your work! Take it to 'Show and Tell' at your quilt guild, or take it to your local quilt/sewing shop, or share it with your sewing friends. Post it on my facebook page (I'll celebrate it with you!) Don't point out your mistakes. And remember, "Finished is better than perfect"!

Happy Sewing and God bless! Maxie

A Hexagon Quilt Video Tutorial: The Honey Pot Quilt

I've been planning this little video (below) for you for quite some time. Today I'm featuring hexagons and the fascinating way they fall together to create a beautiful quilt. I'm so happy for the hexagon revival in the sewing world, whether machine pieced, as in my video, or hand sewn, English Paper Piecing style. In this video, I break down the 'Y' seam, step by step to show you that it's actually one of the easiest quilts to make! And, with no blocks to piece together it finishes much faster than traditional quilts!

photo by Bonnie Christine

photo by Bonnie Christine

This is a pattern that my daughter, Bonnie Christine, and I designed to compliment her fabric line, Sweet As Honey, for Art Gallery Fabrics. All Bonnie's fabrics are available at my online quilt shop with free shipping.

Hexagons

Quilters didn't invent this perfect shape, but, as with may other quilt designs,  we saw the opportunity and adapted it to fabric! Isn't the honeycomb amazing? Our God is great! Hexagons in quilts have been around for a long time. Remember Grandmother's Flower Garden quilts?

istockphoto

istockphoto

So, let's get started! As always, I offer kits for this featured quilt, The Honey Pot, shown in two colorways, on my shopping page. The kit includes pre-cut hexagons (yay!) to make the 65" x 70" quilt shown in the video, the pattern, and a plastic template, (just in case you add more hexagons or prefer to mark your hexagons before sewing). I hope you catch the hexagon fever! Your grandmother would be proud.

Thanks for visiting with me today! Happy sewing and God bless!

On Pincushions

I am a collector of pincushions, and many of my friends know it! I've been gifted with very beautiful pincushions, I've made some and bought some, and I use them! I like to keep one at every station in my sewing studio so that I'm not constantly searching for pins. Here are a few from my collection.

My pincushion collection.

But, realistically, this is what happens at the sewing machine.

Pins accumulate on my sewing machine bed.

It can take so long to pick them up, then pick up the ones that slipped through my fingers and onto the floor, and arrange them into the pincushion. So, I added one more pincushion to my collection.

There are many brands, but this one from Dritz has a little secret drawer on the bottom for chocolate. The package said it was for extra pins, but this just made more sense to me. And yes, I eat them straight from the bag.

My favorite magnetic pin caddy holds my pins and my favorite treat!


So, collect many pincushions and use them all, but have at least one magnetic pin caddy for quickly picking up loose pins. It's very easy to transfer them from the magnetic one to a fabric one because the pin heads stay together!

Thanks for visiting! Happy sewing and God bless! Maxie

Maxie Makes 'Modern to a T' Quilt, a Video Tutorial!

Video tutorials are my favorite things to share with you! Today, I'm bringing you a special pattern that I reworked from a vintage quilt that featured a block popular around 1890. Can we make this modern? Why, yes, we can! I'll show you how in the video below!

While strolling in an antique shop in Asheville, NC, I came across the quilt pictured below. The binding was tattered and almost disintegrated. Hand quilted and hand pieced, it was heavy with the cotton batting so familiar in the old quilts I slept under at my grandmother's house. Maybe that's why I was so drawn to it. I inspected the blocks and saw that it was made with quilt units familiar to most quilters. I felt that this quilt would be a cinch to make, even for a beginner. Watch the video for even more facts about the quilt, and I'll give you some tips and tool ideas that will make it easier than you can even imagine.  Two products help to make the piecing more accurate and timesaving:  Triangulations and the Flying Geese Bloc Loc Ruler, both available on my shopping page, as well as a fat quarter bundle to make the quilt in the colors shown! The pattern is provided with the fabric bundle. Oh, yes! I have a surprise at the end of the tutorial, so, grab a cup of coffee and let's get started!

Double T Quilt Block
The unveiling of the 'Modern to a T' Quilt!

I hope you enjoy today's video...please leave me a comment so that I know you were here. Happy Sewing and God bless! Maxie