Quilt Binding Clips...Wait, Wonder Clips?

I don't know why I call these cute little things binding clips. It seems so limiting. Yes, I do use them for helping hold my binding in place when I'm stitching, whether by hand or machine. But I've found lots of other uses for them and today I decided that they are indispensable. With Quilt Market at hand, Bonnie and I are burning the midnight oil making samples from her Succulance line for her booth. Here is today's project:

Succulance Tote

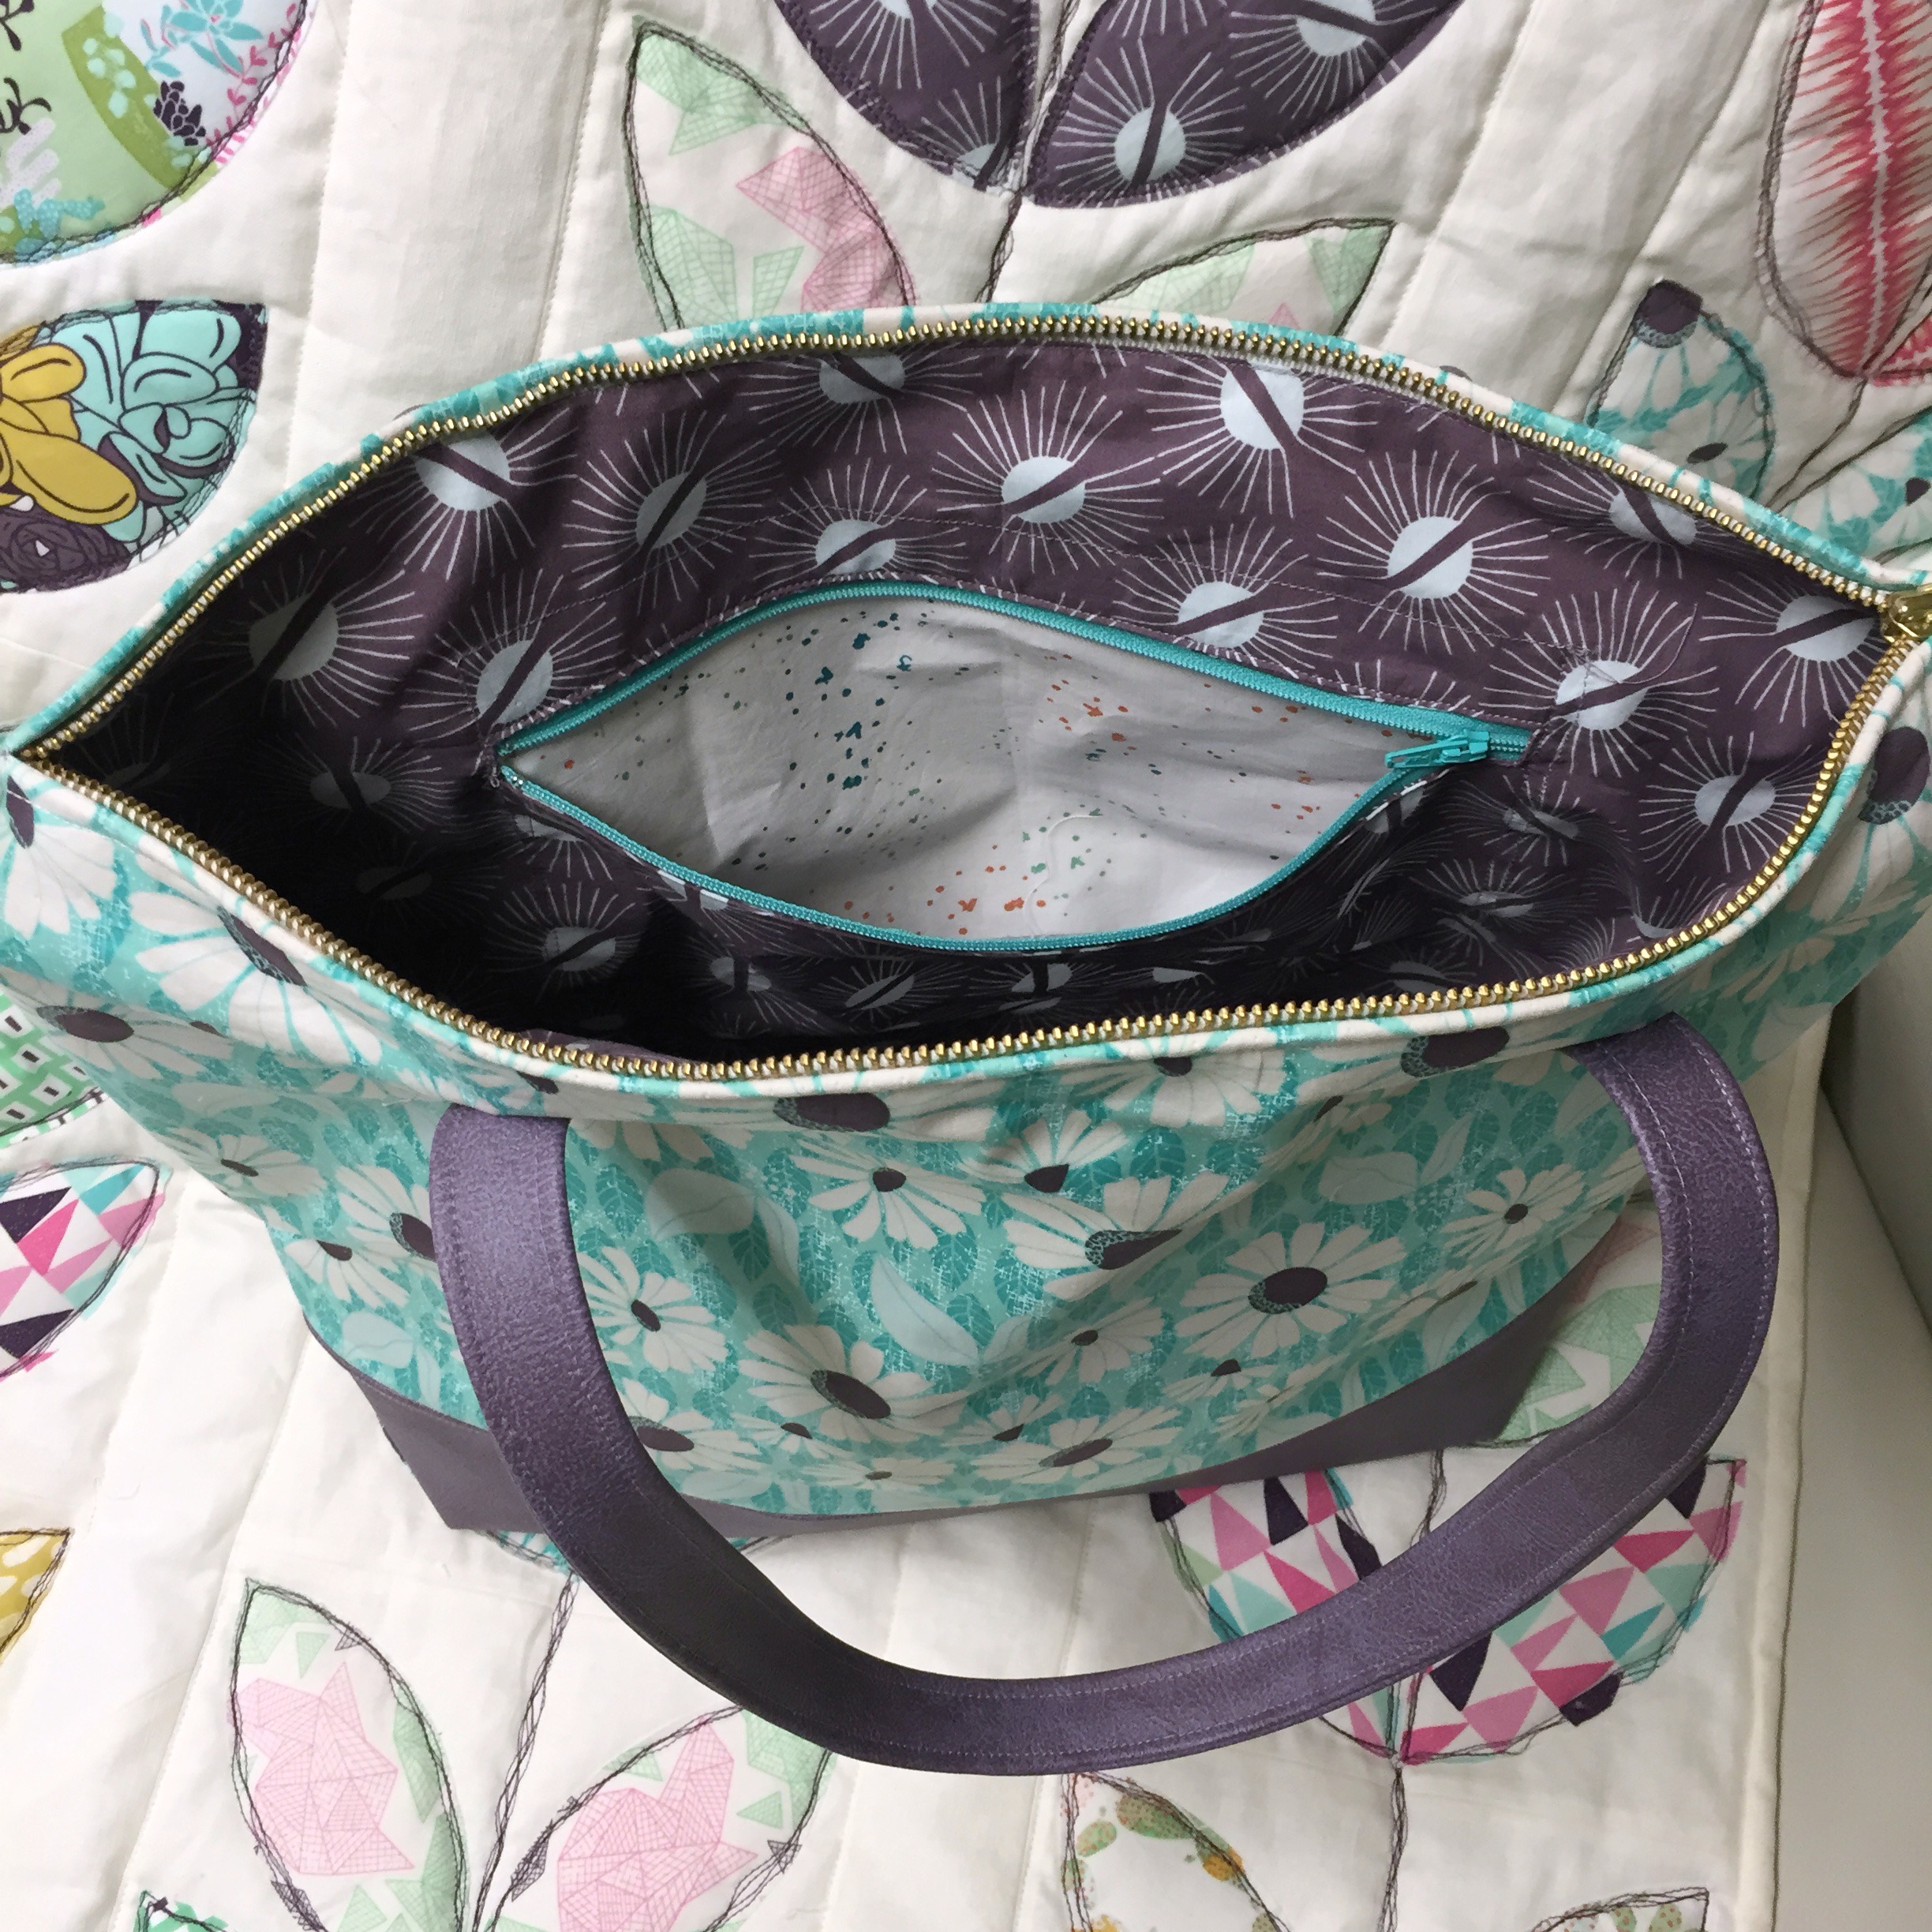
Bonnie wanted a bit of an urban look for this large, zippered tote, and here's what I came up with. There may be a pattern in the near future, but let me share a few pictures of the process with you.

The first picture shows how clips helped hold the bottom of the bag for me as I boxed the corners. The middle picture shows how clips held the faux leather in place as I made the straps. Virtually impossible to do with pins. The last picture shows how I used clips to hold the lining to the top of the bag for stitching. Did you know that the back sides of the clips are flat in order to feed through on your sewing machine bed? (Click on the pictures to enlarge them.) So, I must stop calling them binding clips and use their proper name: Wonder Clips! If you haven't added these to your sewing chest, you might want to consider doing so! You'll find them on my shopping page. Leave a comment and tell me how you use your Wonder Clips!

Succulance Bag
Succulance Bag on Succulance Playful Petals Quilt For Bonnie Christine
Lining of Succulance Bag.

Thanks for visiting today! Happy Sewing and God bless! Maxie


Don't Fear the 'Y Seam'.

I promise 'Y Seams' are easy. Not sure what a 'Y Seam' is? Just as the name implies, it is three seams that come together at one point and form the shape of the letter 'Y'. Dissect a Y and you have three lines. Stitching such a seam is really very easy, but most quilters avoid doing so because they don't understand the construction or they think it might be too time consuming. Let's dispel those fears! I made the hexagon quilt below, and every seam is a 'Y Seam'! (Free pattern by Bonnie Christine and Maxie Makes!) Kit with precut hexies here.

The Honey Pot Quilt

This quilt really went together pretty fast, because there are no blocks to piece, and only simple seams to sew the hexies together. The picture below is a quilt unit from my current project that includes several 'Y Seams'. (At the end of this post is a link to the designer's website, where you'll find great construction tips and the free pattern for the quilt!)

Sewing Perfect 'Y Seams'

So, you see above two fabric strips that have a linen square sewn between them, in the seam. When I first saw the picture of this quilt on The Purl Bee's blog, I thought the squares were applique´d in place. Ah, no, those are all 'Y Seams'. Ok! The first step is to cut the ends of each of the four strips at 45º angles. The Purl Bee's blog shows how to prepare these strips. They are then sewn together, forming the first seam of the 'Y'.

Sewing a 'Y Seam'.
  1.  The photo on the left shows the 1/4" seam allowance drawn on all four sides of the square that will be sewn into the 'Y seam'. I used an iron-off marker, but this is really like training wheels on a bike. You can draw them on a few, but in no time at all you'll understand how the seam is constructed and you'll abandon the pen.
  2. Pin in place and stitch the seam, beginning and ending where your lines intersect. Be sure to secure the stitching at the beginning and ending of the seam. Tip: for a perfectly flat seam, stop just prior to reaching the intersection, just about the distance of one stitch length. Likewise, when you begin the seam, move just one stitch length away from the intersecting lines.
Sewing a 'Y Seam'
  1.  Remove the pieces of fabric from your machine. Line up the raw edges of the fabrics for the other seam. To do so, you'll need to fold your previously sewn seam out of the way.
  2. This laser guidebeam sure comes in handy when sewing across lines, especially imaginary lines! (Thank you, Baby Lock!) Another good excuse to ditch the marking pen! Stitch from point to point and press your seams so that everything is nice and flat!
Perfect 'Y Seams'!

This little quilt will be my version of the Agate Quilt from The Purl Bee. I'll share more of my quilt in a few days...it must be ready for Spring Quilt Market in less than 2 weeks!

Thanks for visiting! Now let's show those 'Y Seams' that we have no fear! Happy Sewing and God bless! Maxie


I Made a TeePee...

I have two daughters. I know how to sew and smock and embroider and make ruffles and tatting and lacey things in hues of any soft pastel. And then my grandson arrived. Would I enjoy sewing for him as much as I did for my girls? Bonnie tested my abilities when she made her first request before he was born:
 A TeePee for the nursery, please!

Make a TeePee

Yeah, I can do this boy thing! I made it as a shower gift, so we used it at the shower to hold her gifts!

Homemade TeePee

It almost held them all! What you can't see is the cushion underneath all the gifts. It's made from a brand new dog bed that I recovered in a lovely feather print canvas!

Making a Cushion for a TeePee

Basically, a TeePee is a semi-circle, with another small semi-circle cut out of the top to allow for the top of the poles. I hemmed the cut edges and around the outer edges of the semi-circle. Then I added grommets at the top for the closure and laced it all with Jute. I pretty much followed the easy directions from this blog (minus the painting!): Sew Mama Sew. A little faux leather banner finished it off perfectly!

Oh, and I find I do love to sew for this little fellow. And he loves everything I make, which makes me run back to the sewing machine time and time again! I made the outfit below from his mama's fabric line, Hello, Bear!

hello_bear_lookbook.jpg


Thanks for visiting and happy sewing! God bless, Maxie


Ric-Rac Quilt Binding

I posted this photo of my ric rac quilt binding on Instagram and Facebook this past weekend, and received some requests for a tutorial! Here ya go...!

Ric Rack Quilt Binding

It sure made a sweet little edging on this quilt, and it was so easy to do! (If you need help with bias binding, refer to last Friday's post.) The photos below demonstrate the technique on a pot holder, but it is applied exactly the same on a larger quilt. This ric rac is about 1/2" wide, and fits perfectly in the binding's seam allowance. If you use a different size, just adjust the alignment of the edges (as described below). I use a separate piece for each side so that I don't have to fold it in the corners. This makes for a neater corner with less bulk. Click on the images below to enlarge them.

1. The first photo shows the rick rac placed even with the edge of the quilt. Let the ends extend a bit past each corner; it will be trimmed later. Cover the ric rac with the binding, placing it as you normally would when attaching it to your quilt. I don't find it necessary to pin or baste the ric rac in place, even on a large quilt. A walking foot is helpful. My Baby Lock's belt-driven walking foot (available for several models) does a super job of keeping all the edges even!

2. Stitch in place, stopping every few inches to make sure the ric rac is still sandwiched evenly, and at the edge of the quilt. Stop sewing a little more 1/4" from the end at the corner. This small amount of extra distance is helpful when slipping in the next piece of ric rac, and it doesn't affect the miter.

3. Lift the binding and place another piece of ric rac on the next side, making sure the edges extend past each corner.


4. Miter the binding as you normally would.

5. The ends of the ric rac will extend beyond each corner. After stitching all four sides, trim the ends away, removing as much bulk as you can. Be careful that you don't accidentally cut the binding!

6. The last photo shows the potholder with the ric rac trimmed, the binding attached and ready to flip to the back side.

Flip the binding to the back side, mitering the corners. I love Wonder Clips, do you? I have to admit that I was skeptical at first because I had lived without them for my whole sewing life. Then I used them. Devoted! I use them for holding heavy seams together on things like tote bags and wallets. No pins needed! The back side is flat in order to move smoothly across the bed of your sewing machine. Tip: I keep my favorite needle for stitching binding right in the box of Wonder Clips! Back to the potholder: stitch the binding in place and and your ric rac binding is complete!

Ric Rac Quilt Binding Tutorial

Thanks for visiting! Be sure to sign up for the MaxieMakes email list! Happy sewing and God bless. Maxie


Bias Quilt Binding...Why? How?

Sometimes a quilt binding just calls for bias. Not always, though, and I usually do use straight grain binding. There is really only one 'rule', as far as I know: Always use bias binding when the quilt has curved edges. A scalloped edge, for example, or curved corners. But there are also important structural reasons to use bias binding, even when a quilt's edges are straight.

Bias quilt binding


Fabric has three named grains: straight, cross and bias. The straight runs parallel to the selvage edge. Cross runs across the fabric from selvage to selvage. The bias grain is on a 45º angle from the selvage edge. There are lots of illustrations to help us visualize this. Once you can envision the difference between bias threads and straight grain threads, it's easy to imagine how those threads fall on the edges of our quilts. Have you ever seen an antique quilt and noticed that the binding was worn much more than the interior of the quilt? It's probably because straight grain binding was used. Straight grain binding only has one or two lengthwise threads laying on the fold of the binding as the outer edge. Crosswise threads weave over and under those two threads, but those aren't really adding much strength. What happens when the lengthwise threads get weak? mmhhmmmmmm.

Bias binding, however, has multiple threads woven together across the fold.  Many bias threads are interlaced together, adding strength to the edge of the quilt. And, as an added bonus, it has stretch, which is why it works well on curved edges!

Bias binding is much easier and faster to make than straight grain binding! Here is a great video tutorial, from McCall's Quilting: How to Make Continuous Bias Binding.

Oh yes, there may be one more 'rule' that is my own: When using a stripe fabric, always make it bias because it twirls and twirls around the edge of the quilt, making a very fun 'candy cane' effect (as in the photo above)!

Thanks for visiting! Happy sewing and God bless, Maxie